Microswiss NG Dual 5015 Blower
Microswiss NG Dual 5015 Blower


Print Profile(0)
Description
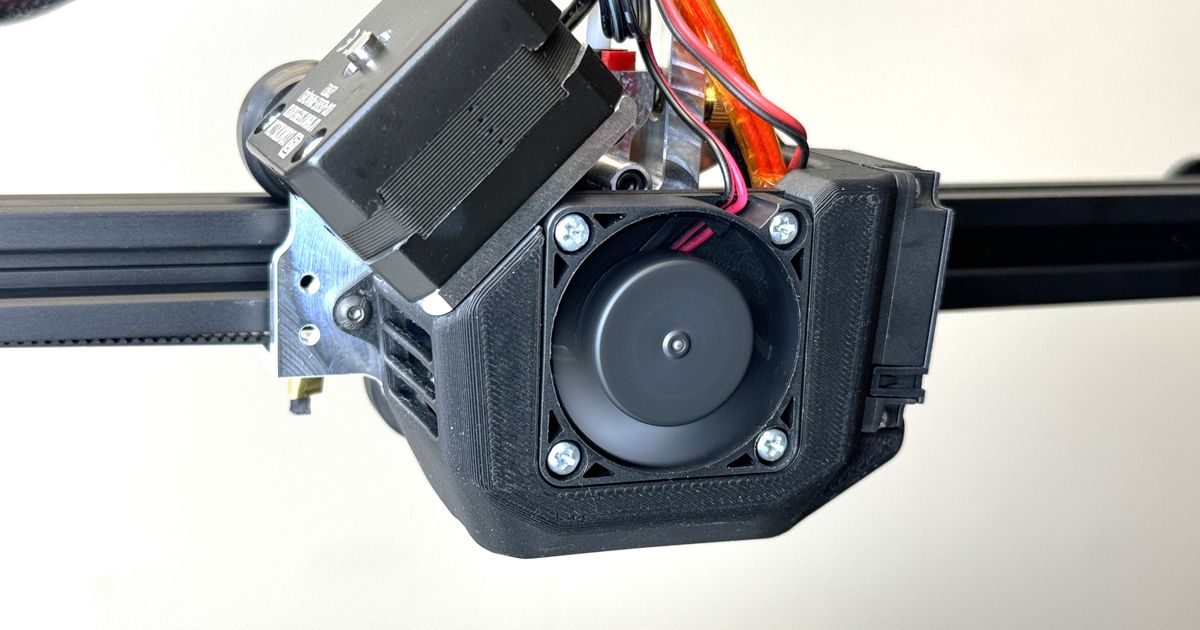
This is part of an assembly starting with a remix i made from the Original microswiss NG shroud to include Dual 5015 blowers to prevent heat creep on the NG and to provide better cooling.
The files include 2 models for the shroud. The first one assumes you have your own probe device or are using the Microswiss BLtouch mount, or i have incorporated a version to utilize a Beacon3D magnetic probe that is embedded into the shroud itself and conforms to dimensions as stipulated by Beacon3d documentation. You will need 2 M3 threaded inserts, and 2 Button head (important) M3 5mm screws to fasten to the shroud.
You will need 4 M4x20mm button head screws and 4 M4 nuts to secure the fans to their mounts.
IMPORTANT: Take care when slicing. Support blockers should be placed on the internal cavity of the part blower all the way from the top of the duct to the print plate. I got the best results using tree supports for the other exposed area's. Printing with supports set to “on buildplate only” is not enough to support all the overhangs near the front/top of the shroud. I will admit that depending on how your slicer handles support blocking, it can be a bit of a challenge to get it to slice right with no support in the internal part fan cavity, but its most certainly doable. Orcaslicer is your friend with this job, although i have sliced it successfully using cura support blocking.
Also required is a M3 10mm button head screw and nut for the right side screw mount to the backplate. Screw it on from the opposite side of the backplate, mount the shroud and use a M3 nut to secure the right side of the shroud. (see pic)
The left side screw goes in as per the original shroud.
The X Gantry assembly incorporates a semi-articulated camera mount that will fit a Raspberry Pi Version 1 or version 2 camera.
This gantry mates up to the Ender 3 as shown in the renders and pics and will fit a standard ender 3 or as in my case one with linear rails fitted. You will need 4xM3 10MM screws to replace the ones provided from creality.
For the camera mount you will need a 15mm M4 socket head screw and a M4 nut to secure the articulating camera to the mount.
The camera shroud requires 4xM2 15mm screws and 4 M2 nuts.
The original creality X stop switch requires 2xM3 5mm screws with 2xM3 nuts.
The drag chain i used is a 10x11mm drag chain i purchased on aliexpress https://www.aliexpress.us/item/1005002038905501.html?spm=a2g0o.order_list.order_list_main.123.31eb18026uJGX7&gatewayAdapt=glo2usa
You will need 6xM3 8mm screws, 6xM3 nuts and 6 M3 washers to fasten to the shroud and gantry mount.
Cable tie anchor points have been provided on the X gantry mount to fasten cables entering the drag chain to deter slipping.
I printed mine with 5 walls, 5 floors, 5 roofs, 50% gyroid infill, .2mm layer height, .25mm initial layer height and line width at .4mm using a .4mm nozzle. Its a long print at those settings, but i wouldn't push the walls count lower than 3.
BOM
4 M4x20mm button head screws
2 M3 5mm screws
2 Button head or flat (important) M3x5mm screws
4 M4x20mm button head screws
1 M3 10mm button head screw
4 M3 10MM screws
1 15mm M4 socket head screw
4 M2 15mm screws
2 M3 threaded inserts
5 M4 nuts
4 M2 nuts.
3 M3 nuts.