Shrinkage Calculator - Dimensional Calibration Tool v9
Shrinkage Calculator - Dimensional Calibration Tool v9


Print Profile(0)
Description
Print the test Piece → Measure it with your callipers → Input the measured results in the Google Sheet Calculator → Get the results from the sheet with calculated Shrinkage → Input in your slicer → Voilá, perfectly calibrated print's shrinkage compensation.
With the Google sheet open, from the File menu there is the option to make a copy in your GDrive. This will give you your own, editable copy
New version of the dimensional calibration tool.
The revised part is easier to measure, and should give more accurate results.
The spreadsheet now considers both scaling error due to shrinkage, as well as radial compensation error.
- Print the test part using your filament of choice, and slicer settings you intend to use.
- Measure and input into the spreadsheet (mine is shared at https://docs.google.com/spreadsheets/d/14Nqzy8B2T4-O4q95d4unt6nQt4gQbnZm_qMQ-7PzV_I/edit?usp=sharing).
- Update slicer settings.
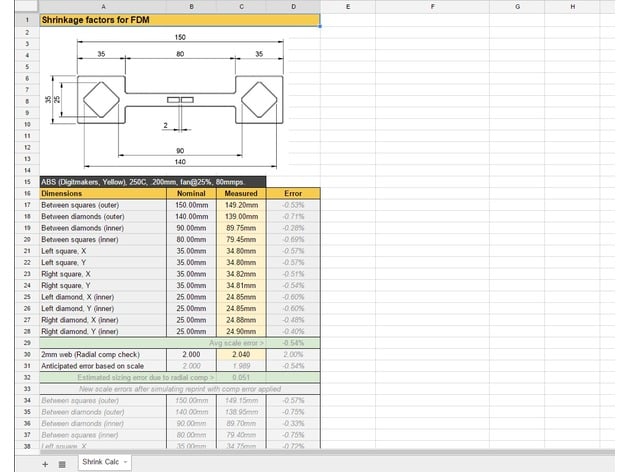
The concept is to measure all but the smallest part feature. These larger features will be most affected by errors due to shrinkage, and least affected by errors due to radial compensation errors. The scaling error percentages are populated.
Next, measure the smallest feature. This feature is least affected by shrinkage, and most affected by radial comp errors. The spreadsheet estimates what the error 'should' have been based on the scaling errors found on the larger features, and attributes the difference to radial comp error. This radial error is populated.
Next, the spreadsheet recalculates the scaling errors found on the larger features by 'simulating' that you reprint the part with the radial comp adjusted, then takes an average of these values as the final scaling error for your slicer.
Lastly, at the bottom both the scaling factor to input and the radial shift (called horizontal size compensation in my slicer) are populated. Plug these into your slicer.
This file was originally uploaded by member LuckyPants on Thingiverse back in 2016. All credits go to him. I just wanted to have this UMBELIEVABLY GOOD tool available here for the comunity in Printables (https://www.thingiverse.com/thing:1982686/files)