Lithophane Light Box with WIFI


This object has been checked for printability, but did not pass the test and was deemed not printable. This object is still shareable and people with this link will be able to see and download the object, so please make sure you watch out and progress with care!
×Lithophane Light Box with WIFI
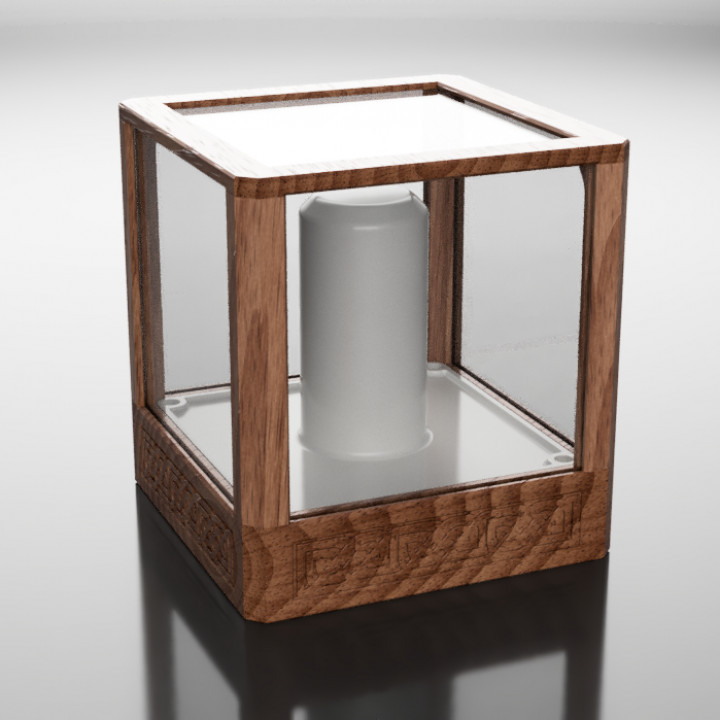
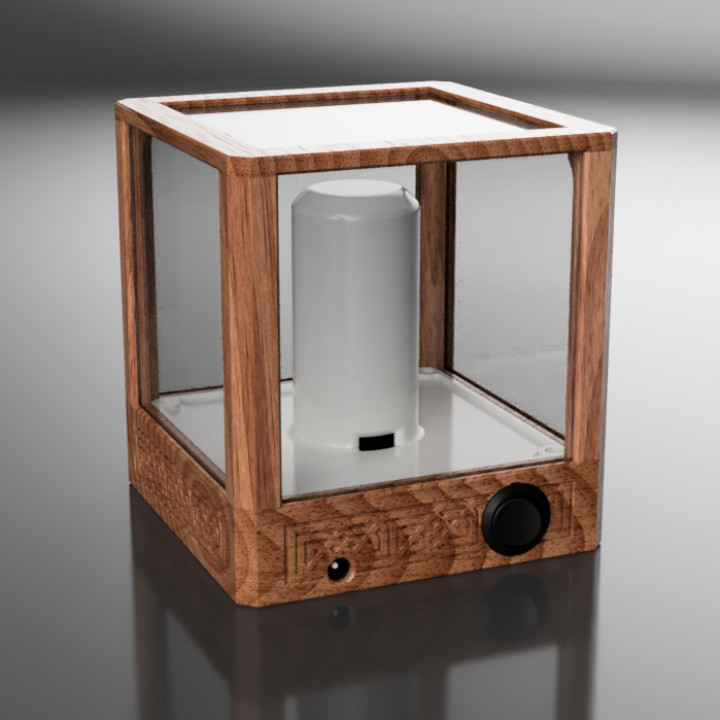
There are countless lithophane enclosures on the internet but i always wanted to design my own to fit my needs. So i came up with this design that you can fit five lithophanes which gives you the opportunity to display your favorite photos in a stylish way.
It uses a Wemos D1 Mini v3 which has mounting holes for easier assembly and if you follow the instructions below you only have to flash the firmware once and then you can change the colors of the led strip from you smartphone through the Blynk app.
NOTE #1: I haven't tested the printability of the parts since i don't have a 3D printer nearby for a long time, hence the project has no real build images.
NOTE #2: The sketch file is slightly different than the one provided by 3D Maker Noob. I added EEPROM functionality so the values of each color(red, green, blue) is stored when power plug is pulled.
Hardware requirements:
---------------------------
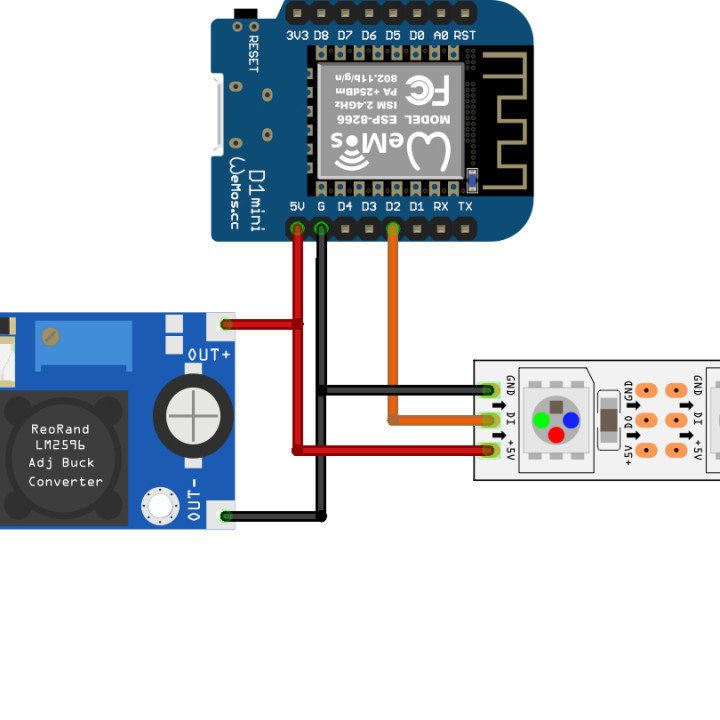
- Wemos D1 Mini v3 (Aliexpress.com).
- WS2812B 60leds/meter (Aliexpress.com).
- Power supply with at least 2A output to power the led strip.
- LM2596 step down converter (Aliexpress.com).
- DC Jack 5.5x2.1mm (Aliexpress.com).
- Rocker switch (Aliexpress.com).
- Some wires to connect everything based on schematics.
- 2xM2 5~6mm screws for mounting the Wemos D1.
- 2xM3 5~6mm screws for mounting the LM2596.
- 4xM3 10~25mm screws for mounting the led_mount_cover.
- 4xM3 20~30mm screws for mounting the parts together
- (OPTIONAL) Rubber feet (Aliexpress.com).
Hardware notes:
---------------
- Choose the white non-eco PCB for maximum blend if you are printing the led_mount_cover in white color.
- Only buy the step down converter if you have a power supply with higher voltage than 5V. Choose the red one as it is the one i have and tested.
Instructions:
-------------
Download Arduino IDE sketch file.
Please follow the instructions, for uploading the code to the Wemos D1, provided by 3D Maker Noob in his lithophane game of thrones video as this project is based on his tutorial.
You can also follow the wiring process as well if it's too hard to follow the steps below.
Visit http://3dp.rocks/lithophane/ and upload your favorite photos. Then go to:
- Settings->Model Settings: Make sure Maximum Size is 100mm and Border size 3mm.
- Settings->Image Settings: Make sure the first slider is set to positive image.
Choose flat as the type of lithophane and then download the stl.
NOTE: Your photos must be 100x100mm so they can fit in the enclosure.
- STEP 1: Glue the pivots to the pillars. They are designed to be friction fit but if they don't fit, sand them a little bit before gluing them.
- STEP 2: Push the rocker switch in the hole on the back making sure the tab is facing up. Then solder two wires to the pins.
- STEP 3: Solder some wires to the dc jack and then push the dc jack in the slot. If it too loose apply some hot glue to keep it in place.
- STEP 4: Solder some wires to the the three pins of the strip. Now pass the led strip through the cover and out of the small hole and start wrapping it around the pole until you get to the top and make sure there is at least one led facing up to light the top lithophane panel. Cut any excess strip that's left.
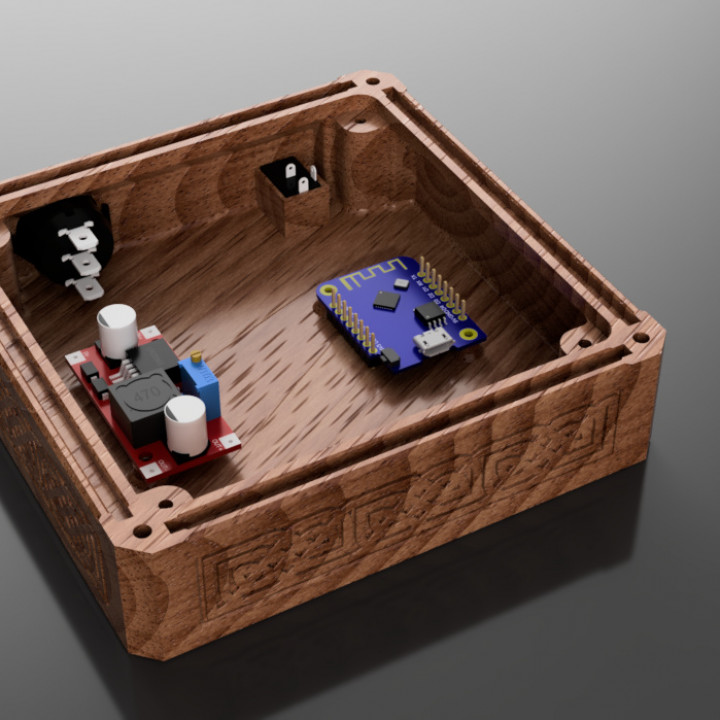
- STEP 5: Mount the LM2596 and the Wemos D1 to their mounting locations using the two M2 and M3 5~6mm screws.
- STEP 7a: Using 6~12V and LM2596
- STEP 1: Solder one wire coming from the rocker switch to the negative pin of the dc jack and the other wire to the negative input of the LM2596.
- STEP 2: Solder the positive wire of the dc jack to the positive input of the LM2596.
- STEP 3: Solder two wires to the 5V and GND pins of the Wemos D1.
- STEP 4: Take the 5V wires of the Wemos and led strip and solder them to the positive output of LM2596.
- STEP 5: Do the same for the GND wires as well but connect them to the negative output of the LM2596.
- STEP 7b: Using 5V and not LM2596
- STEP 1: Solder one wire coming from the rocker switch to the Wemos GND pin.
- STEP 2: Solder the positive wire of the dc jack to the Wemos 5V pin.
- STEP 3: Solder the 5V wire from the led strip to the 5V pin of the Wemos.
- STEP 4: Solder the GND wire from the led strip to the GND pin of the Wemos.
- STEP 8: Solder the data wire from the led strip to D2 pin of Wemos.
- STEP 9: Screw the cover with the four 10~20mm screws to the base.
- STEP 10: Place on lithophane panel in the top and then push the pillars with the glued pivots to the top to fix the lithophane in place.
- STEP 11: Take the remaining four lithophane panels and place them between the pillars and make sure they are pushed all the way in.
- STEP 12: Now mount the base using the four 20~30mm screws.
- STEP 13: Plug the power and turn the switch. Follow the steps in 3D Maker Noobs video to configure the Blynk app.
- STEP 14: Enjoy your new lithophane light box!!


The stl files are named as {X}x_name_of_part.stl, where {X} is the quantity you have to print each part.
I highly recommend the parts be printed in woodfill filaments as it will look better than plain filament especially after you post process it and apply a few coats of varnish. Take a look in the pictures i provided for inspiration.
Also the lithophane panels must be printed vertical with the help of brim and 100% infill.
| Status | Rejected |
| Time to do | 60 - minutes |
| Dimensions | 120mm x 120mm x 130mm |
| Support Free | YES |