05/07/2020 : Update 2.8 - Small rearward offset of the side lugs for better retention of PVC sheets.
English bellow
This headband is used to make protective visors.
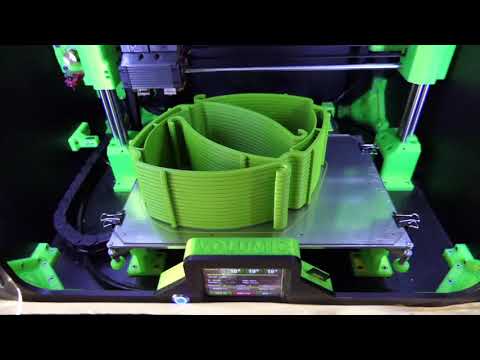
The parts are designed to be printed stacked, without material support.
The Fusion360 model is available here: https://a360.co/2S4vMOl
This model is an evolution of the one proposed by Erik Cederberg (https://www.youmagine.com/designs/protective-visor-by-3dverkstan)
Here are the dimensions of the headband:

There are two types of headbands, Open and Closed:

For each of the two types, there is :
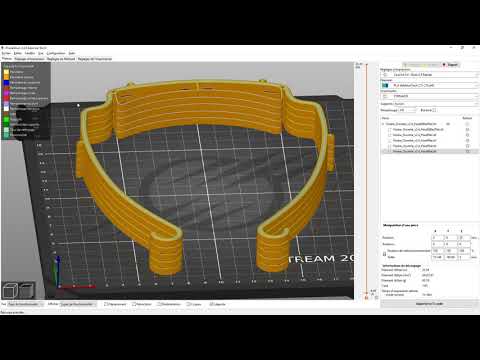
the part that is placed on the tray, it has a flat underside for a better contact with the tray and therefore a better adherence. The name of the file ends with _1er
the pieces that we stack then, they are those ending with _Layer03 or _Layer04. You will have understood it, the one which ends by _Layer03 is optimized for layers of impression of 0.3mm, and the one whose name ends by _Layer04 is optimized for layers of impression of 0.4mm. These parts are hollowed out on the bottom side (groove in yellow in the illustration below) to decrease the contact area with the bottom part and allow for easier detachment of the parts.

If I want to print a stack of closed headstands for example, I place the Visiere Close_1st.stl piece on the board first (in green in the illustration below) and stack as many Visiere Close.stl pieces on top of it as I want (in blue).

You can mix models. Nothing prevents you from putting an open model on top of a closed model, and vice versa:

##The slicer
If you are using PrusaSlicer, you can use the project files (.3mf) available in the drive:
- In PrusaSlicer, you do file - Open project and select the project you are interested in:

For a first impression, I invite you to open the file Stack Test 1x4 Headset Mixed.3mf. It contains four headstands, two open and two closed. Printing this test stack takes 1h35, it will allow you to validate that everything is working properly with your machine before tackling more copious.
If you don't use project files, but want to use my print settings, go to the [Slicer Settings] folder(https://drive.google.com/open?id=1hSzfXRG8DO9S2XgQhQfm1KJknbaFYwiw), you will find the config PrusaSlicer Layer 0.4 quick.ini file which contains my print settings. If you use a project file (.3mf) it is already in there.
Some explanations on the slicer settings : Video
Printing parts: Video
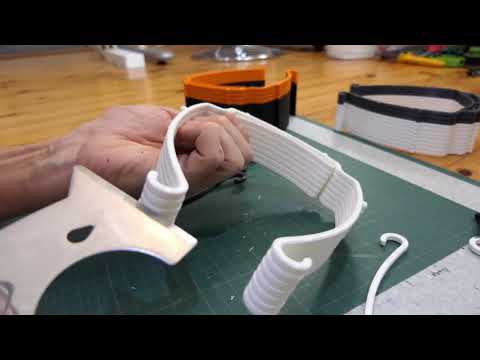
Part separation: Video
If you are using another slicer than PrusaSlicer, you will have to manually transfer the settings to your tool. You can find screenshots of my settings in the [Slicer Settings] folder(https://drive.google.com/open?id=1hSzfXRG8DO9S2XgQhQfm1KJknbaFYwiw).
The determining parameters are :
The parts were modeled to get an optimal result with one of the 0.3 or 0.4mm high print layers. I personally got better results printing the 0.4mm version (_Layer04)
Delamination problem
If the layers are not properly bonded to each other, you can try the following solutions:
- Increase the material flow by 10% (from 1 to 1.1).

- Print the parts with a layer height of 0.3mm. It works, separating the parts is a bit more difficult.
English
This headband allows you to make protective visors.
The parts are designed to be printed stacked, without material support.
The Fusion360 design is available here: https://a360.co/2S4vMOl
This model is a remix of the one proposed by Erik Cederberg (https://www.youmagine.com/designs/protective-visor-by-3dverkstan)
Dimensions of the headband are :
There are two types of headbands, Open and Closed:
For each of the two types, there are:
the piece that is placed on the build plate, it has a flat bottom for better contact with the bed and therefore better adhesion. File name ends with ** _1er **
the pieces that are then stacked are those that end with ** _Layer03 ** or ** _Layer04 *. As you can see, the one that ends with * _Layer03 ** is optimized for 0.3mm print layers height, and the one whose name ends with ** _Layer04 ** is optimized for 0.4mm layers height print. These parts are carved on the underside (groove in yellow in the illustration below) in order to reduce the contact surface with the part below and allow easier detachment.
If I want to print a stack of closed headsets for example, I place the piece Visiere Close\ _1er.stl first (in green on the illustration below) and stack on top as many Visiere Close.stl as I want (in blue).
We can mix the models. Nothing prevents putting an open model above a closed model, and vice versa:
##The slicer
If you use PrusaSlicer, you can use the project files (.3mf) available in the drive:
- In PrusaSlicer, go to * file - Open project * and select the project that interests you :
For a first print, I recommend that you print the file Stack Test 1x4 Headset Mixed.3mf. It has four headsets, two open and two closed. The printing of this test stack takes 1h35, it will allow you to validate that everything is working properly with your printer before going one step further.
If you are not using project files, but want to use my print settings, go to the Slicer Settings folder, there you will find the file config PrusaSlicer Layer 0.4 rapid.ini which contains my print settings. If you are using a project file (.3mf) it is already there.
Some explanations on the slicer's settings (in French) : Video
Printing parts : Video
Stack splitting : Video
If you use a slicer other than PrusaSlicer, you will have to manually transfer the settings to your tool. You will find screenshots of my settings in the Slicer Setting folder.
The determining parameters are:
Delamination problem
If the layers are not properly bonded to each other, you can try the following solutions:
- Increase the material flow by 10% (we go from 1 to 1.1)
:format(webp)/https://fbi.cults3d.com/uploaders/12913395/illustration-file/09125c3a-29da-4e02-8168-66a27ded8857/P1000796.JPG)


/https://preview3d-images.cults3d.com/qcco4h8cqkfgkpr2qbeqhe7b5u37)
/https://preview3d-images.cults3d.com/nepncgjjtnuk0vbbo4kedb6im2oa)
/https://preview3d-images.cults3d.com/bfwqaj5szizywg9wd1w3ylziacuc)
/https://preview3d-images.cults3d.com/bd3l451fptf7l7hy4uibi7h1pmrj)
/https://preview3d-images.cults3d.com/g871vr8px7p8299khsc6ryaery48)
/https://preview3d-images.cults3d.com/fn9n1778nnffgyer6ft5hr6u8qi5)
/https://preview3d-images.cults3d.com/v1cilyvr9bze4uv7iol9ujp4jzez)
/https://preview3d-images.cults3d.com/131oezpizdjc2rhwqgqvptbizle3)


:format(webp)/https://fbi.cults3d.com/uploaders/12913395/illustration-file/9d97c963-c200-4c1e-9ff1-7e515a42c88c/IMG_20210219_102607_compress67.jpg)
:format(webp)/https://fbi.cults3d.com/uploaders/12913395/illustration-file/868bbcd2-6aae-40ab-a96e-febb9aa17d07/IMG_20210219_175453_compress98.jpg)
:format(webp)/https://fbi.cults3d.com/uploaders/12913395/illustration-file/3c57abf8-a62b-4206-ab82-e09c886ea7f1/IMG_20220522_173633-FullHD.jpg)
:format(webp)/https://fbi.cults3d.com/uploaders/12913395/illustration-file/83c65d00-3afc-4af6-b107-350020db8a73/P1000325_43.jpg)