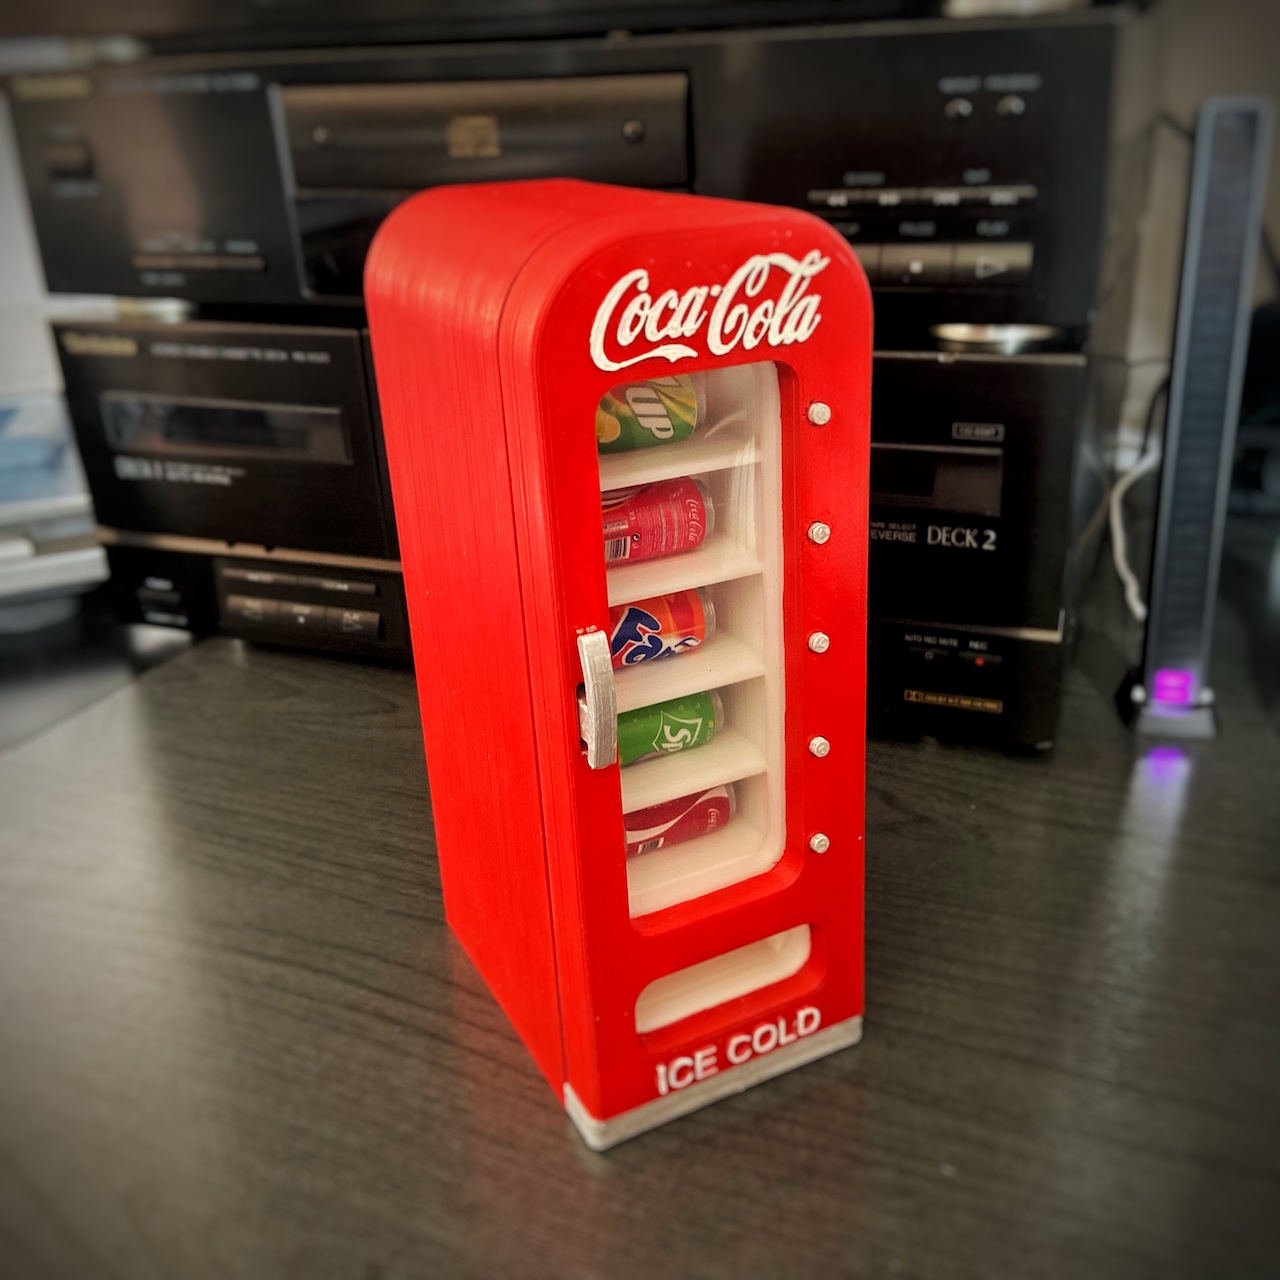
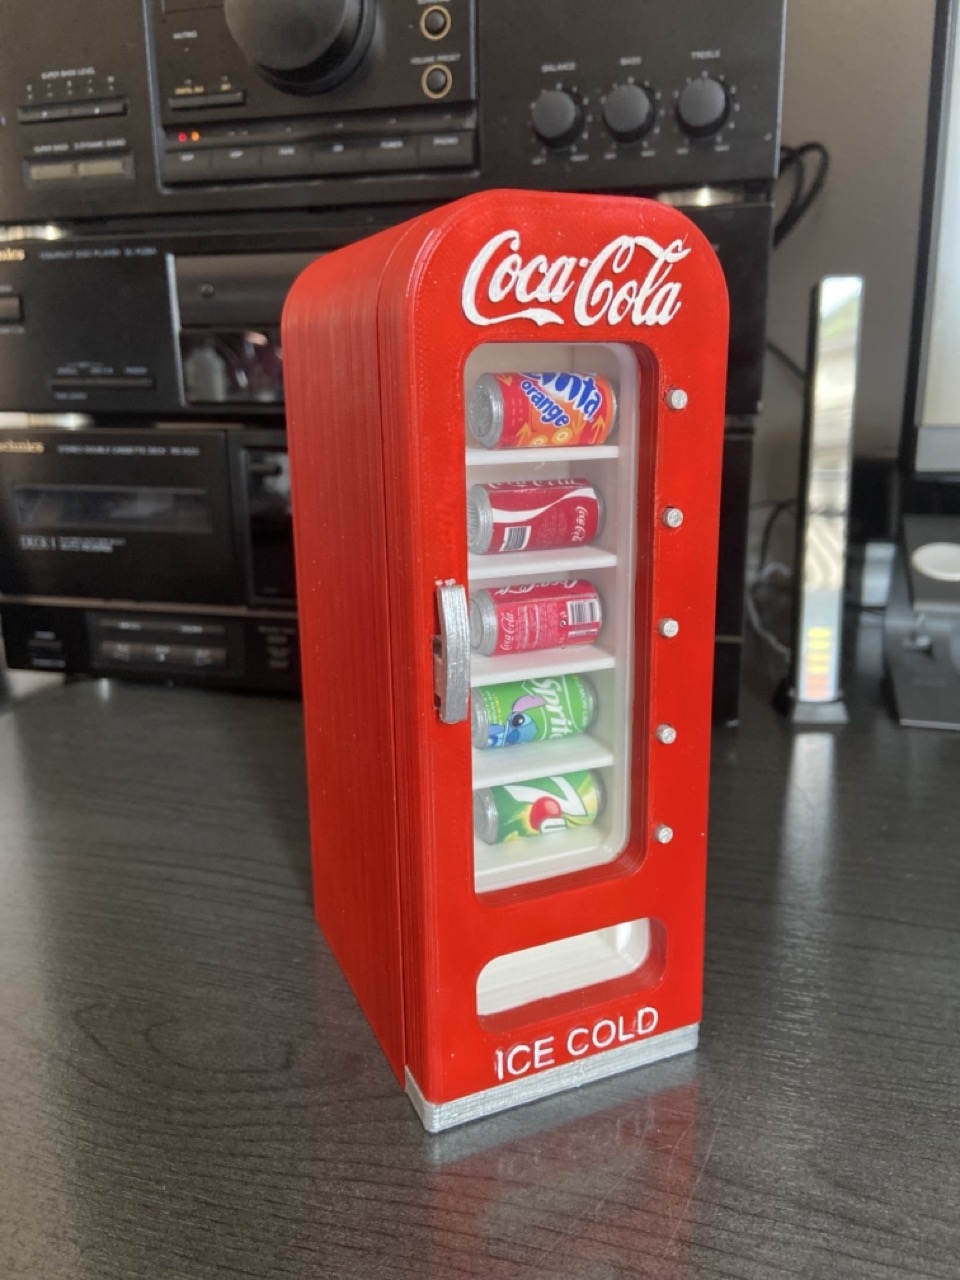
Here it is, the perfect ornament for your desk!
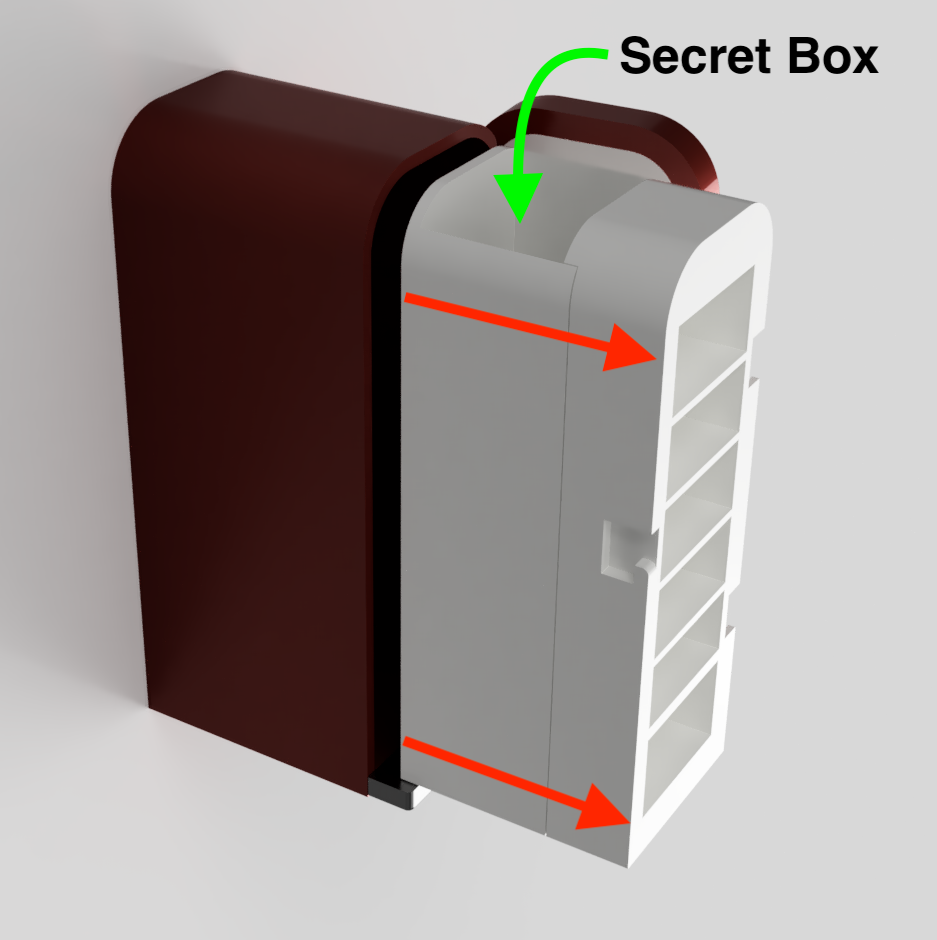
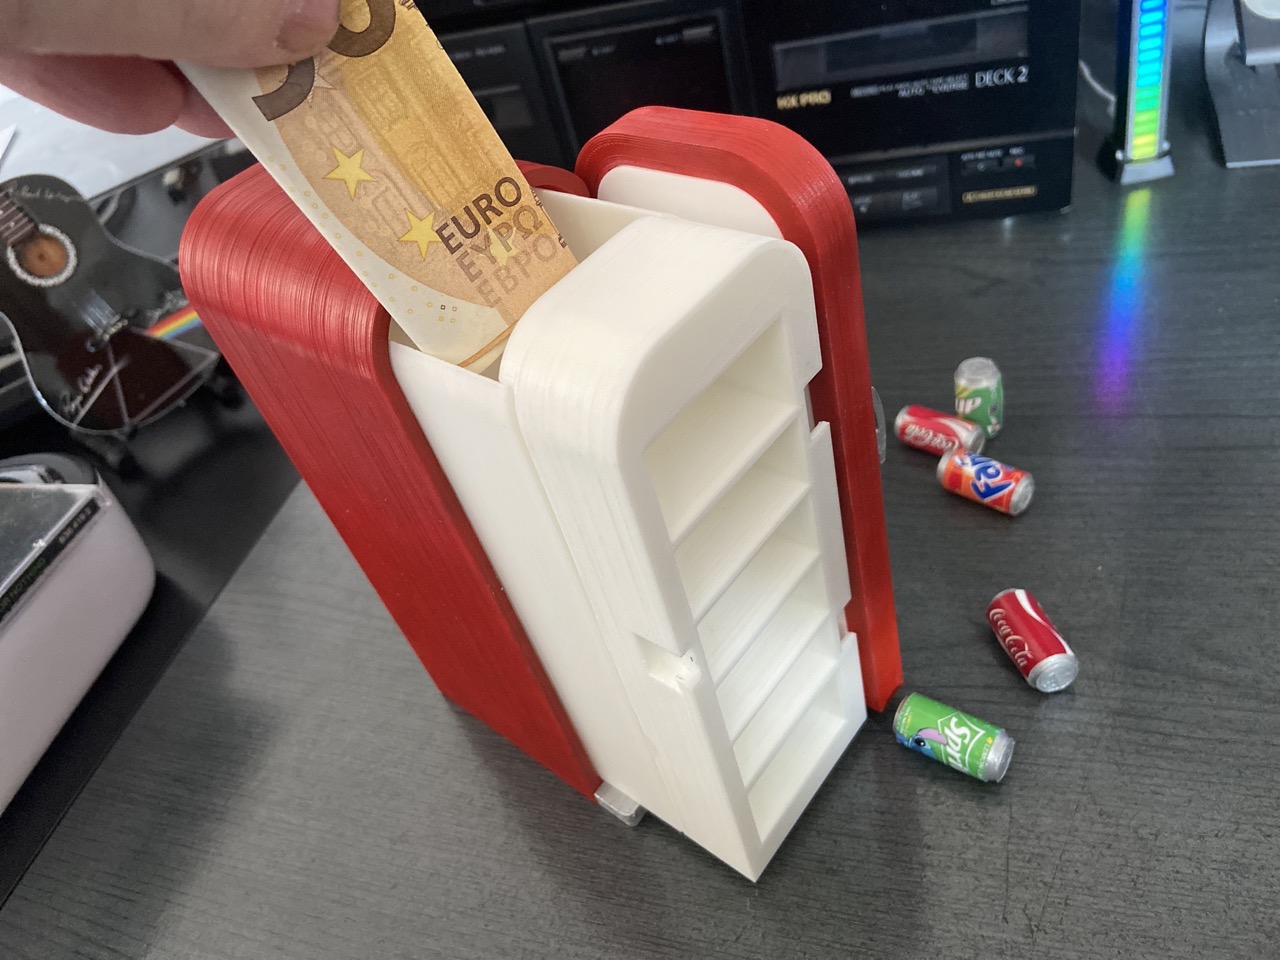
The design is inspired to a real Mini fridge and.. it' not only a decoration... it hide a box where you can put all your secrets!
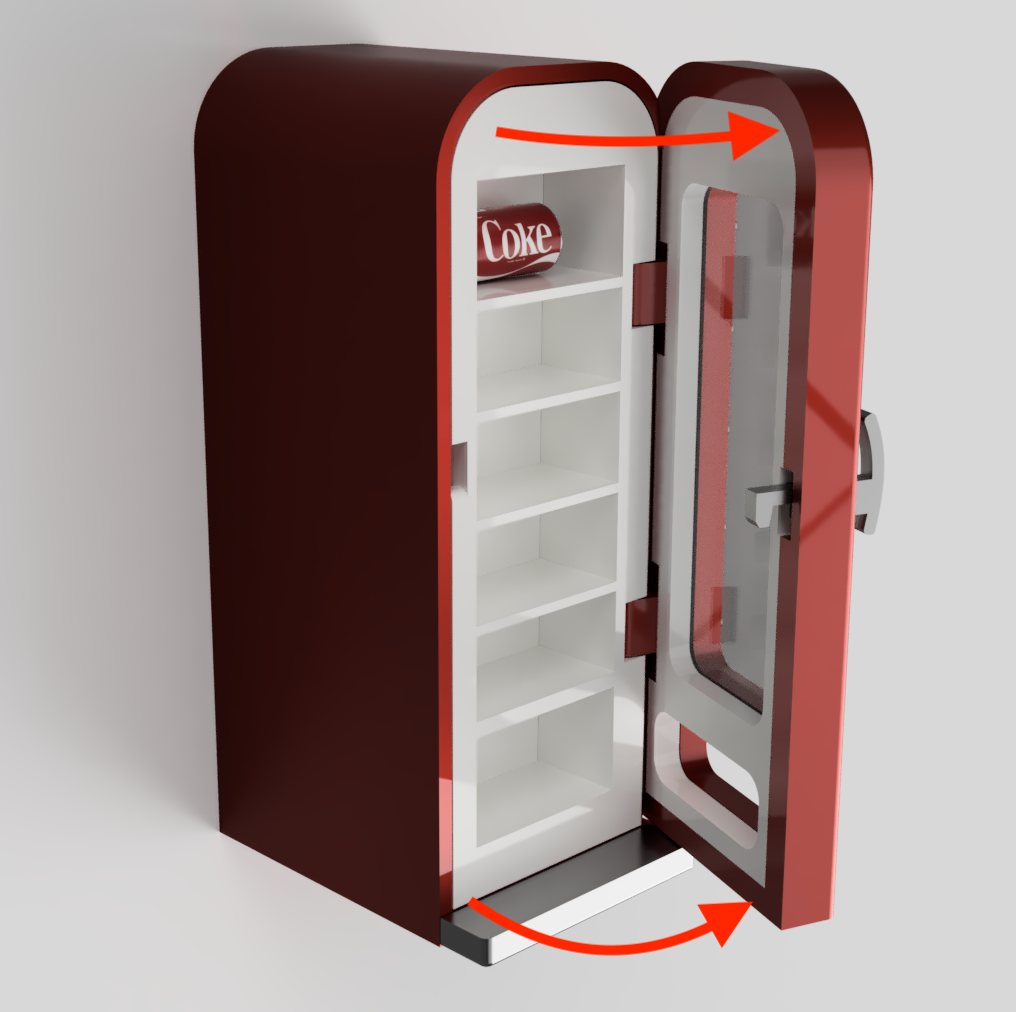
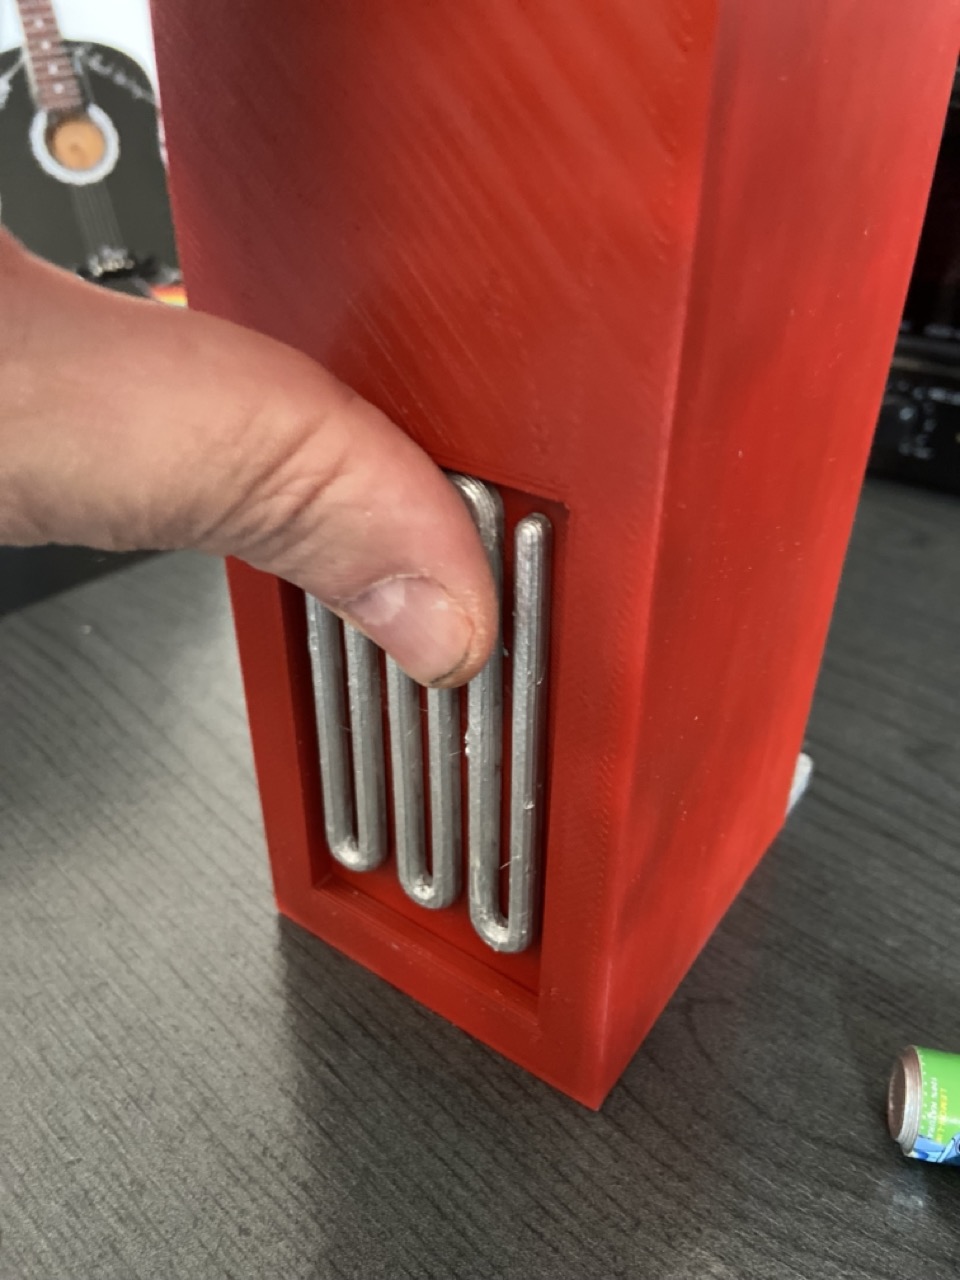
To access the secret compartment you need to know the trick!
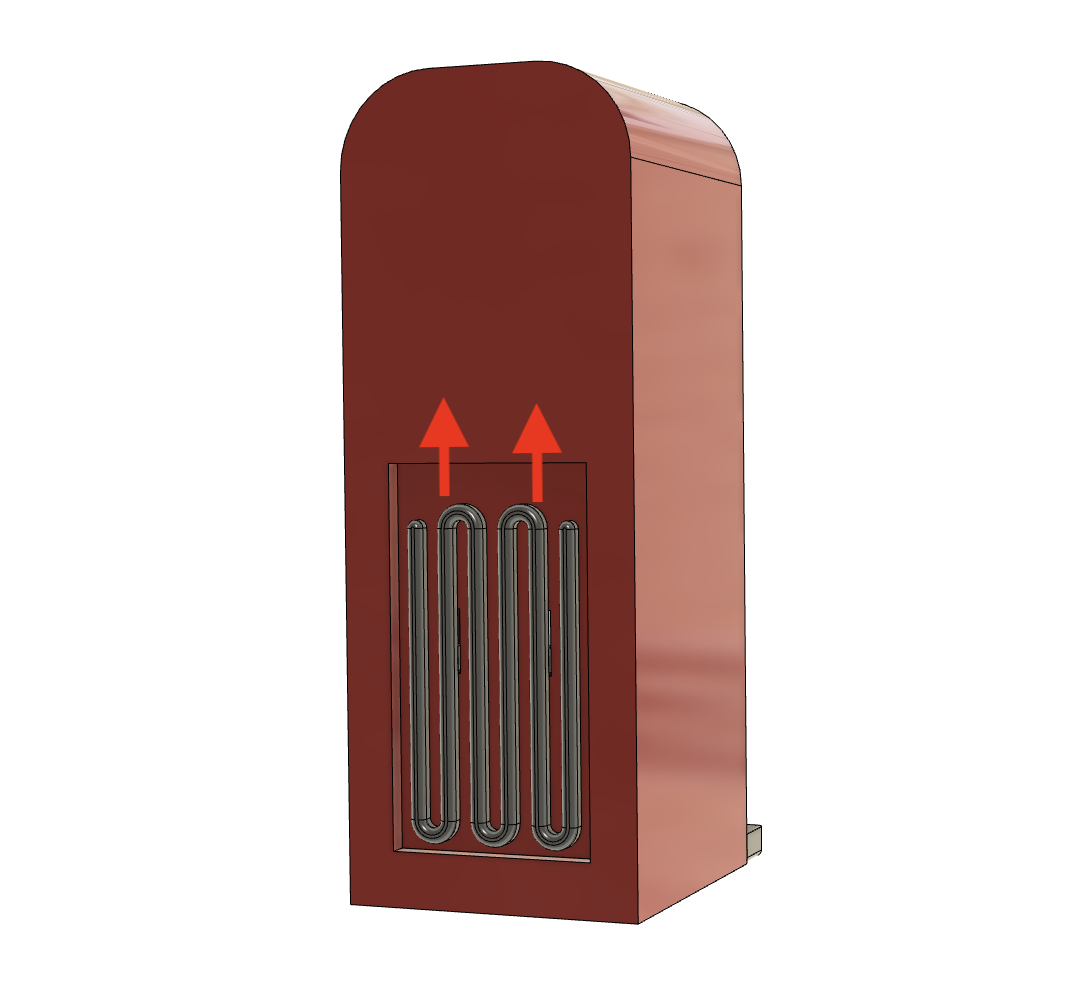
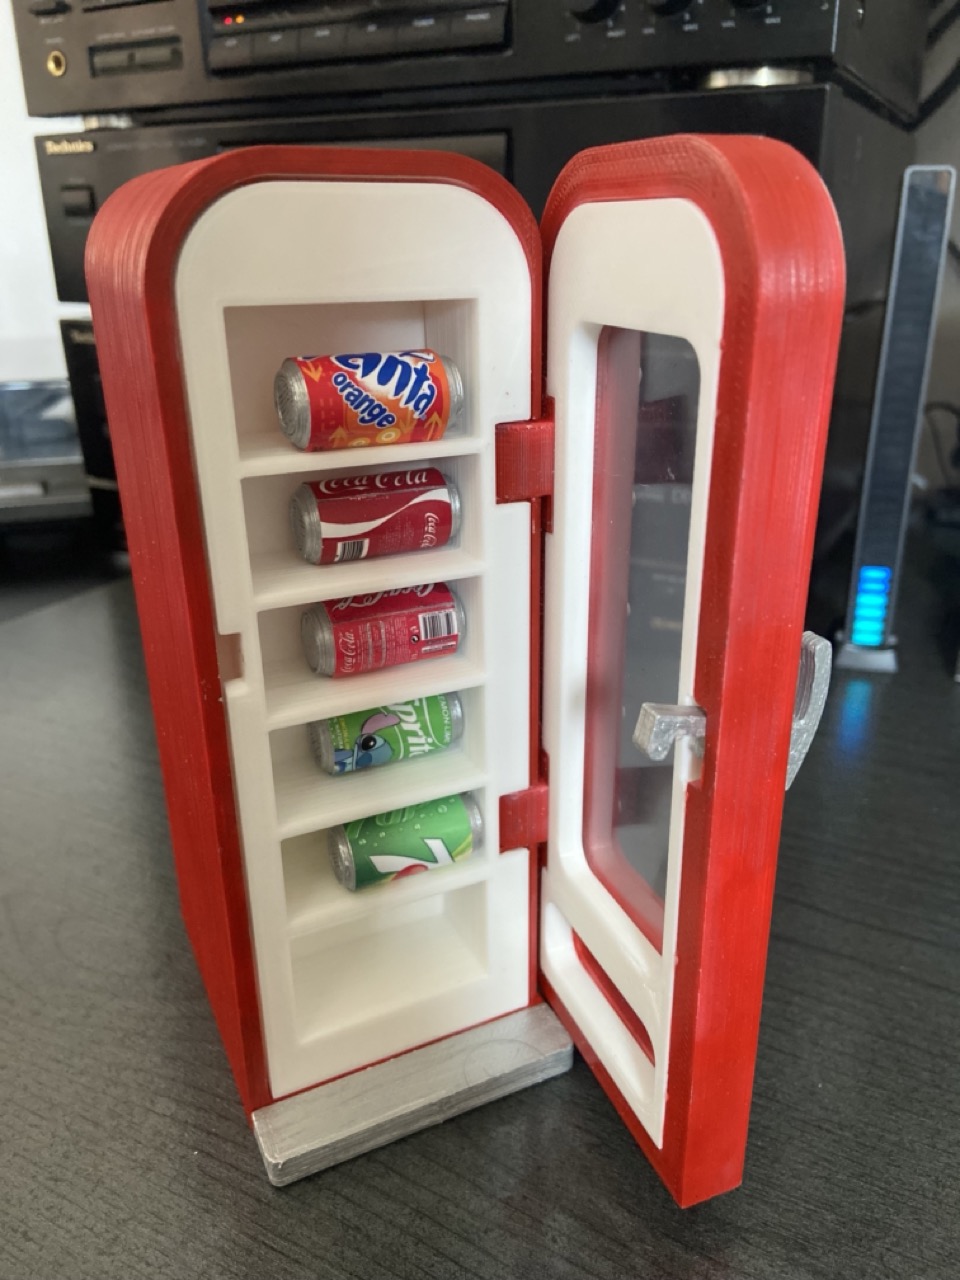
Just move the coil on the back upwards, open the refrigerator and remove the internal part.
The template has been designed to be printed in 3 different ways, depending on how you want to use it.
- The "Main" project has a secret compartment; Follow all printing and mounting instructions as directed.
- The "Piggy Bank" project allows you to use the Model as a container for your reams, with a practical slot on the top. Replace the "Body Main" file printout with the "Body Main Ver Piggy Bank" file.
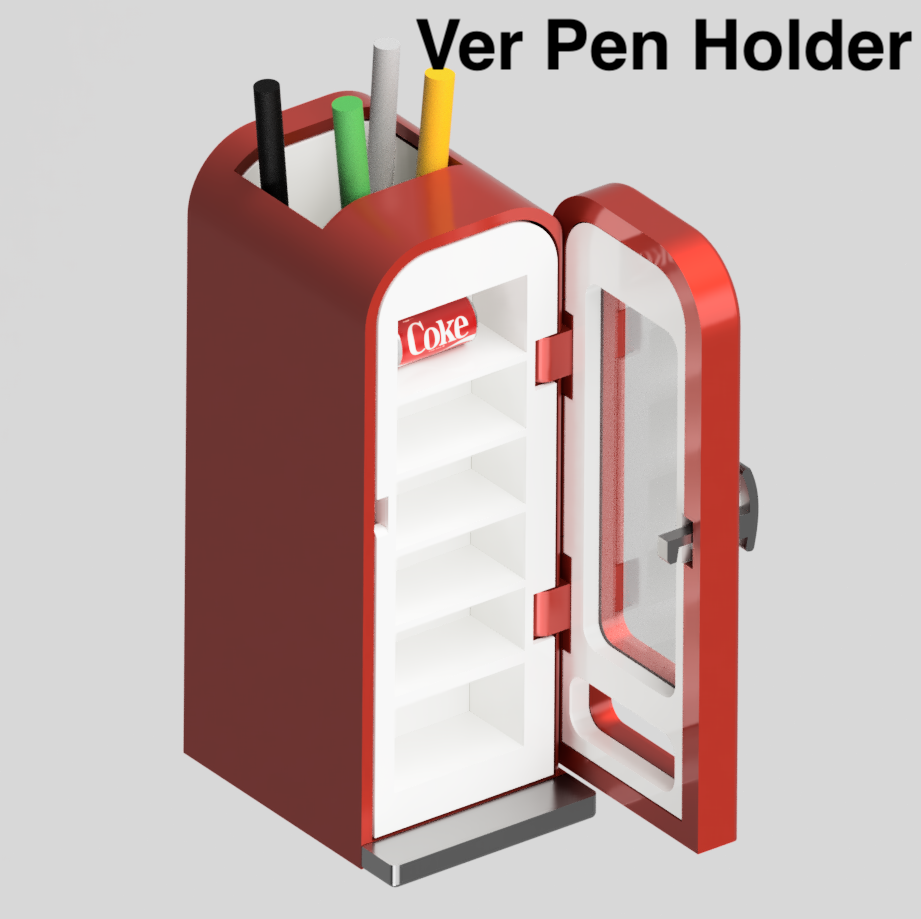
- The "Pen Holder" Project allows you to use it on your desk as a container for your pens and pencils. Replace the printout of the "Body Main" file with the "Body Main ver Pen Holder" file and the "Body Inside" file with the "Body Inside ver Pen Holder" file.
Simple assembly!!
You can print all the elements in the colors as indicated below, but if you want a truly 50's effect, my advice is to paint it.
If you don't intend to paint the whole set, you will only need 3 filament colors:
- Red: Body Main, Body Rear, Door, Door Pin Up, Door Pin Down.
- Grey: Body Front, Coil, Handle, Handle Pin, Can, Key
- White: Body Inside Rear, Body Inside Front, Door Inside
If instead your intention is to color the piece, you can use white filament for the white parts (it will not be necessary to color them) and any other color for all the other parts.
In addition to some Loctite SuperAttack glue, you will need a sheet of at least 12x6cm of semi-rigid transparent plastic with a maximum thickness of 0.3/0.4mm for the door glass.
You will also need a sheet of adhesive photo paper for the soda can labels.
PRINTING INSTRUCTIONS:
PLA White
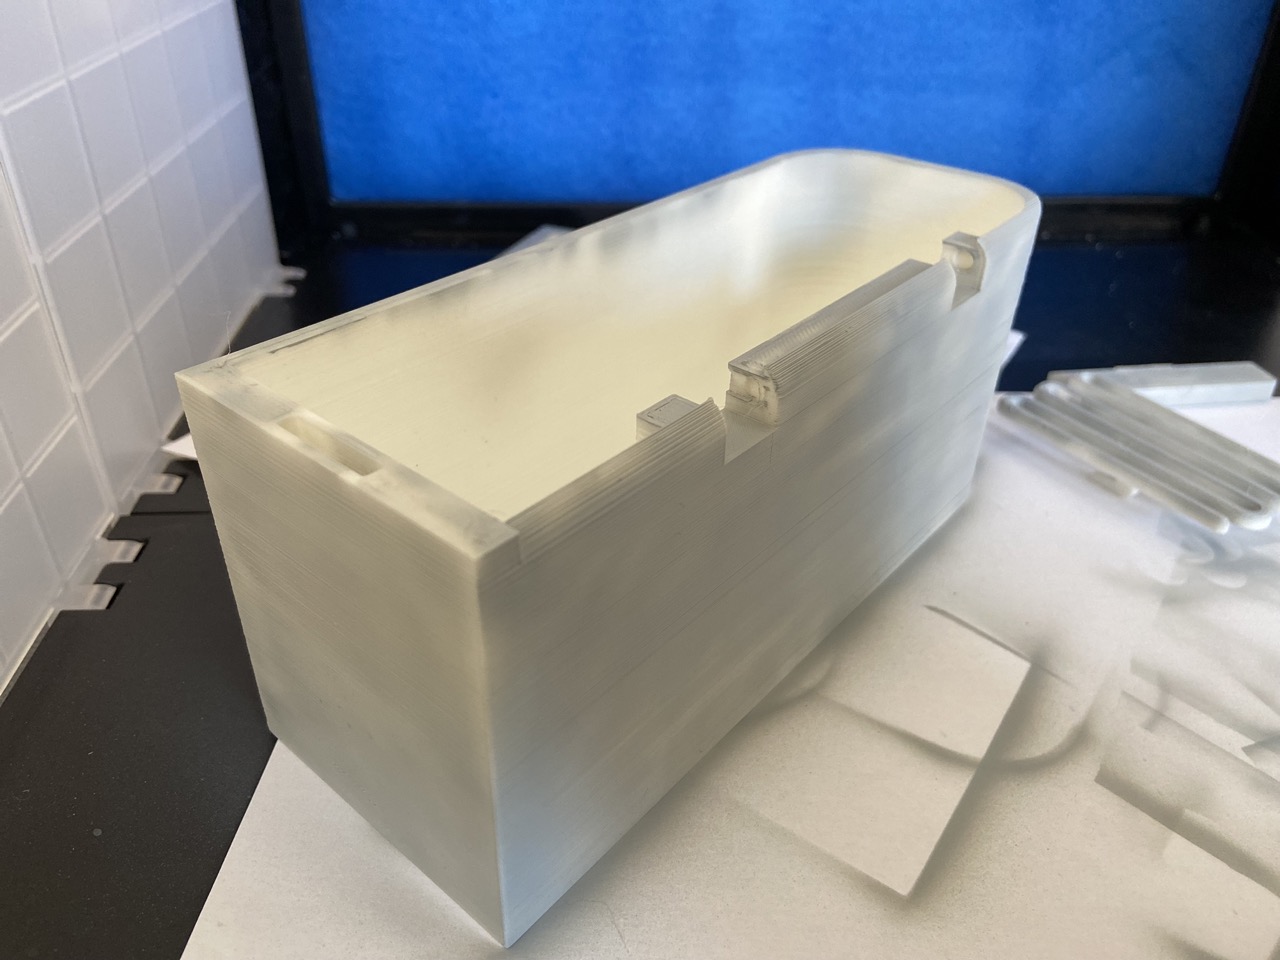
1. Body Inside Rear: rear side on the Base, no Supports;
2. Body Inside Front: rear side on the Base, apply normal supports everywhere and at the end of the print, remove the supports (be careful when removing the lock support);
3. Door Inside: side with the part with the cut for inserting the glass upwards. No supports.
4. Glass Template: as you prefer, no supports.
PLA Red
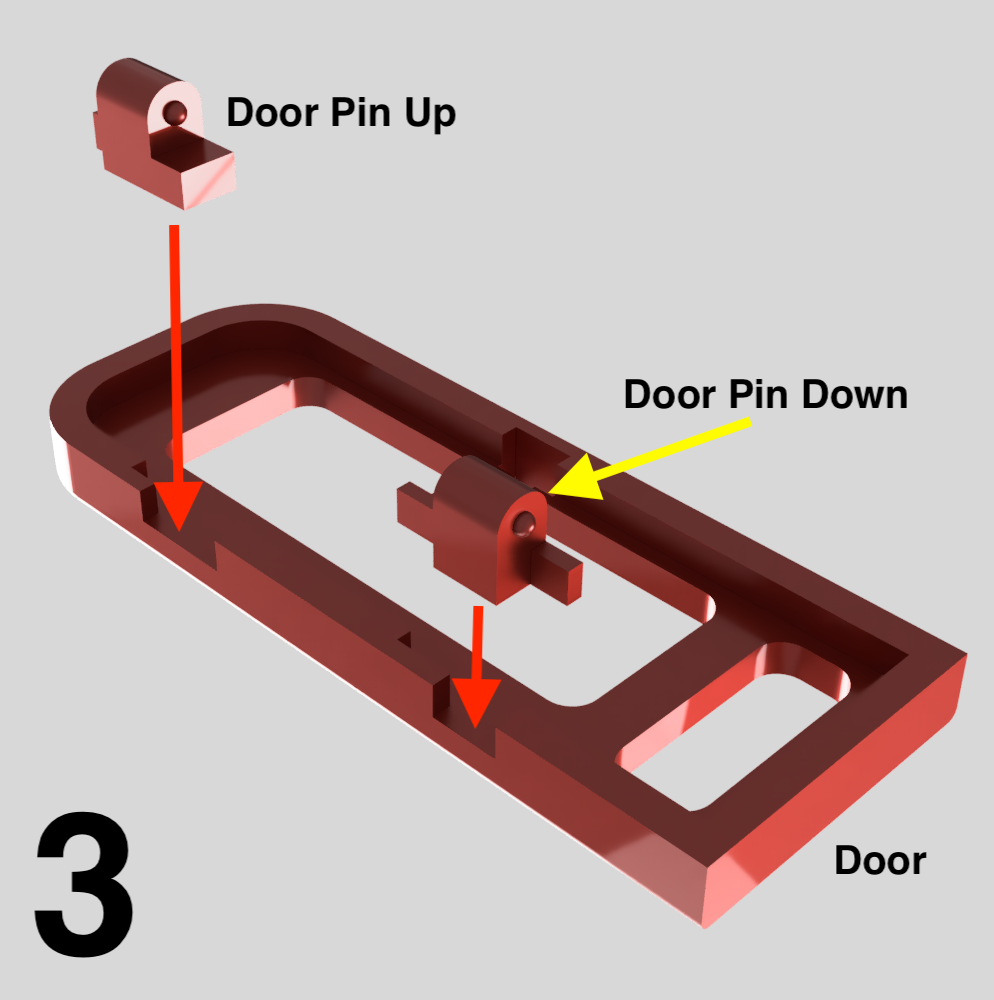
5. Door: side with the word "coca cola" facing upwards, apply normal supports.
6. Door Pin Up & Door Pin Dows: side with pins on the top, no supports needed.
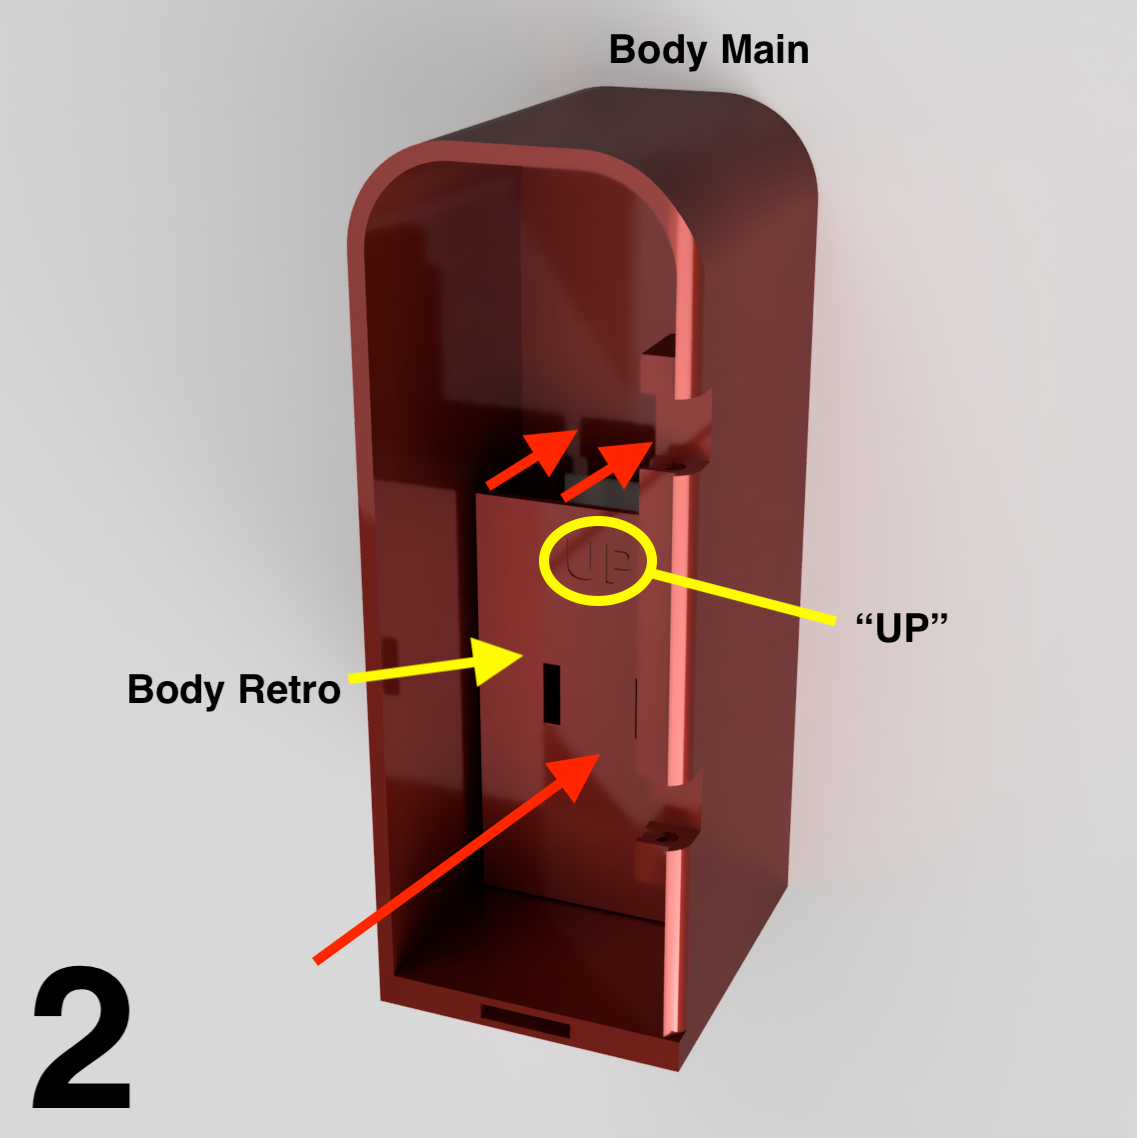
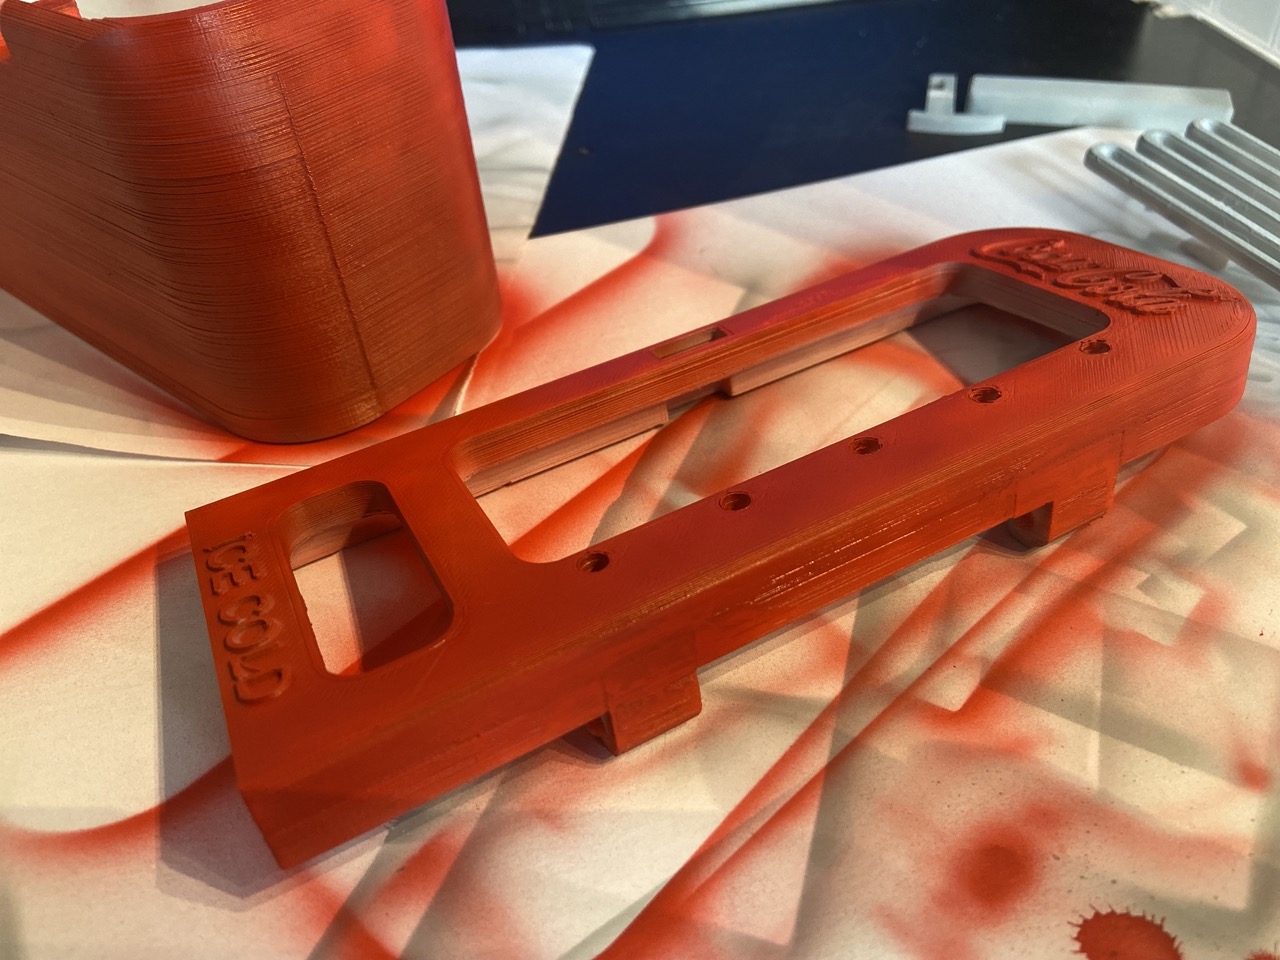
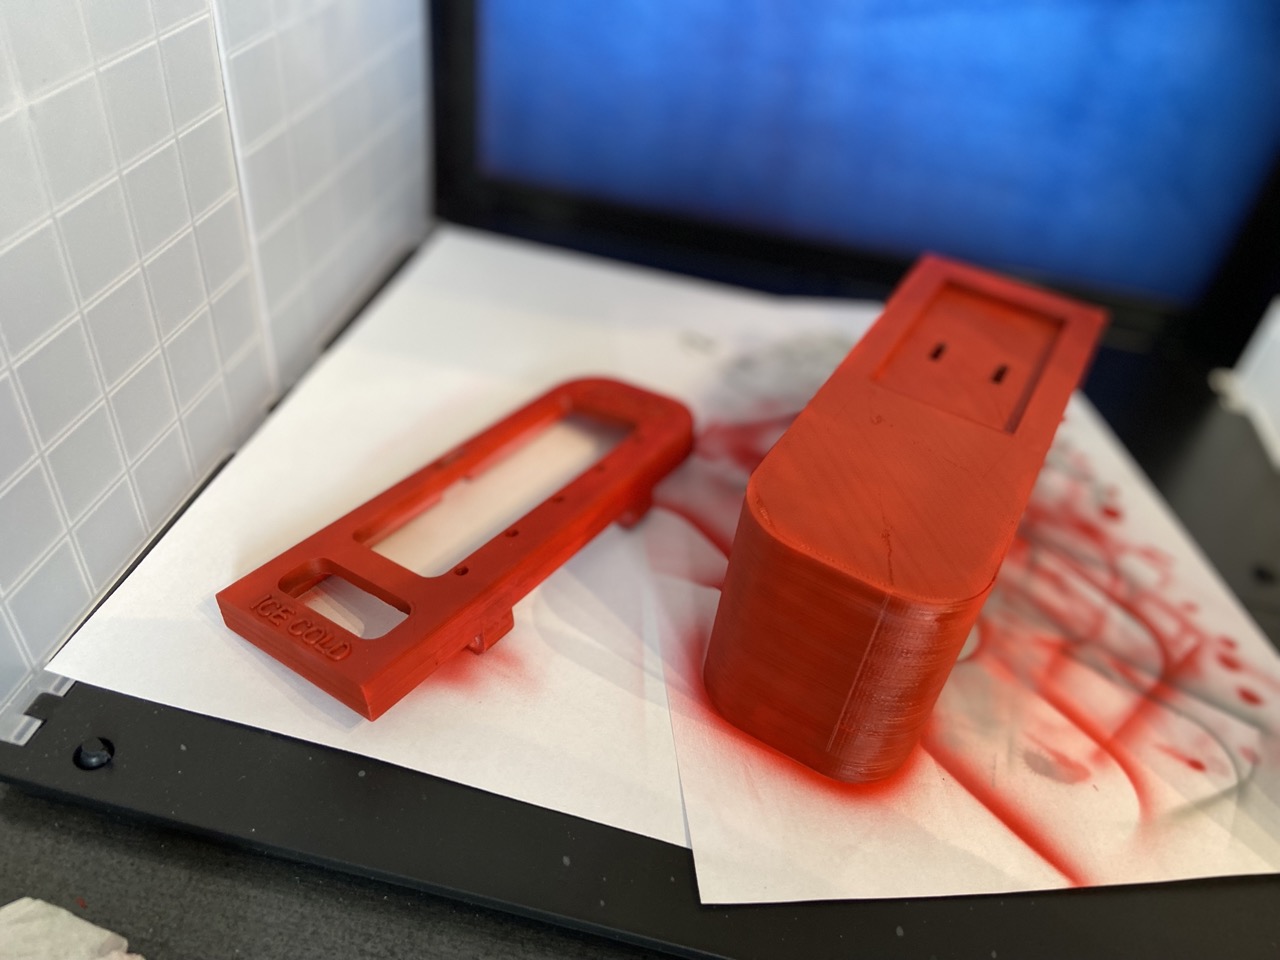
7. Body Main: rear side on the bed, no supports.
8. Body Retro: side with che words "UP" on top; no supports.
PLA Grey
9. Handle: side without the hole for the pin on bed; no supports needed.
10. Handle Pin: as you prefer; no supports.
11. Body Front: part with rounded front on the top; apply normal supports.
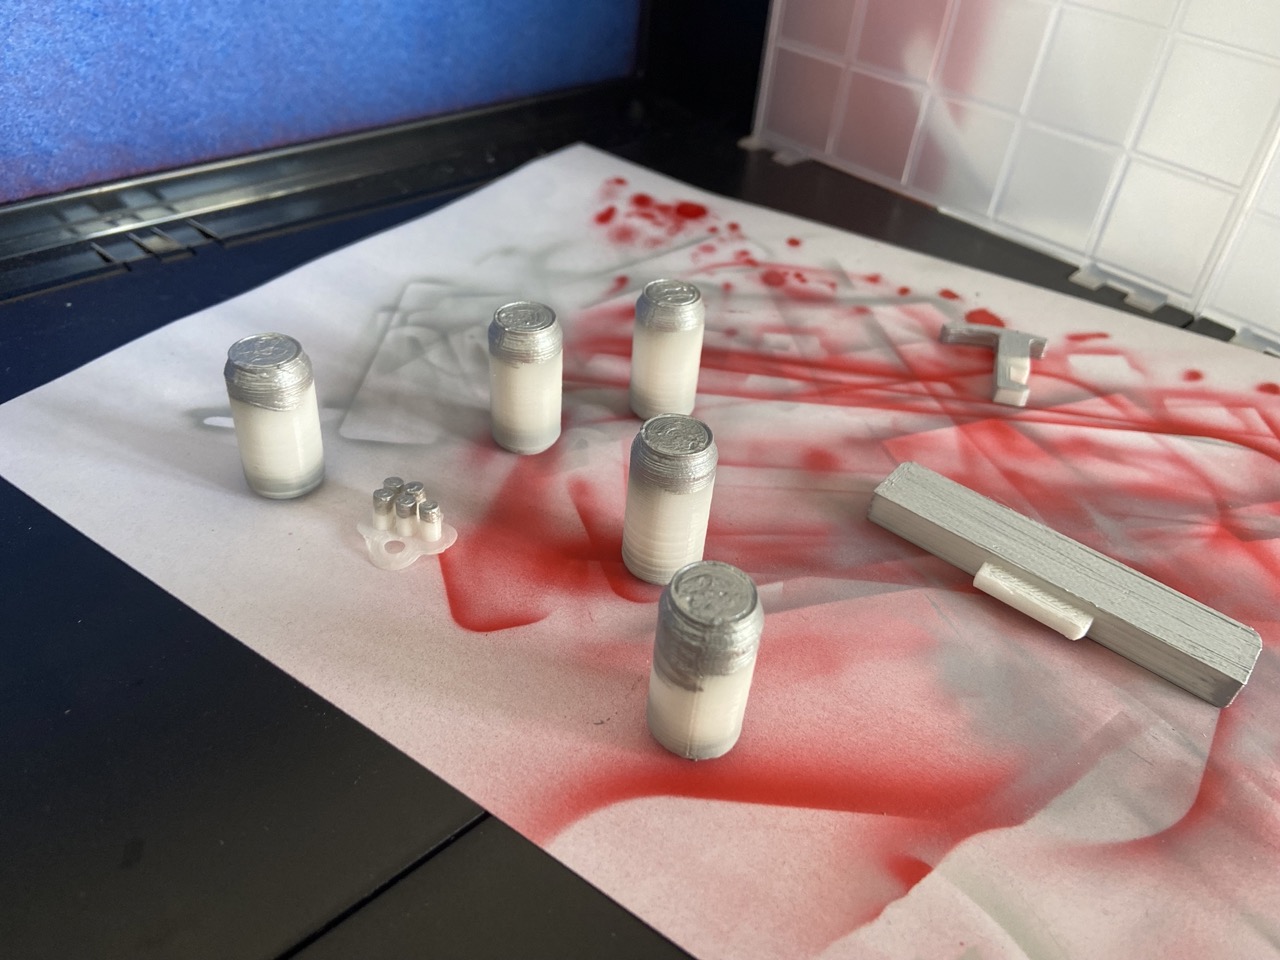
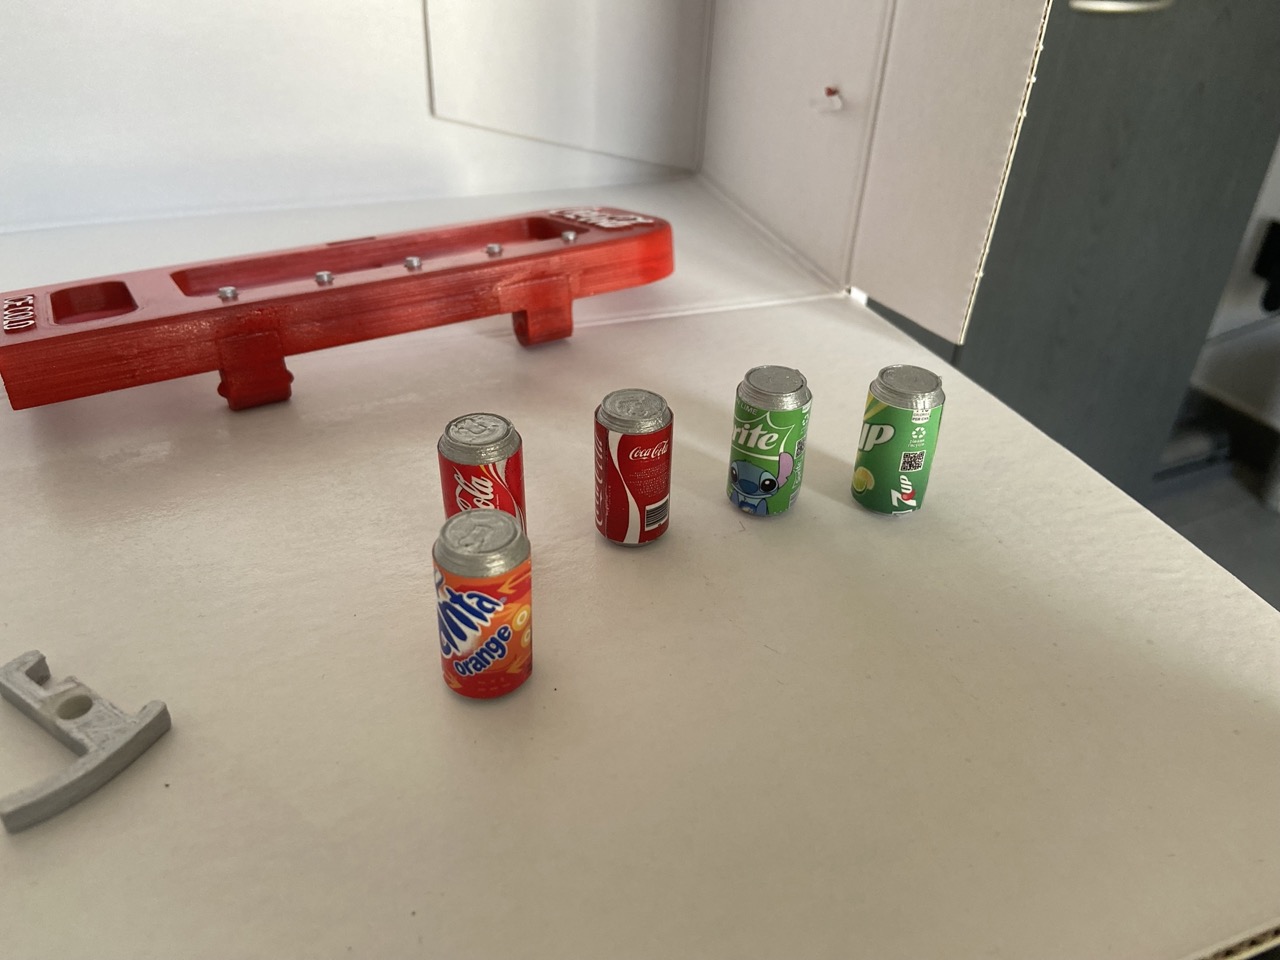
12. Can: print 5/6 of this file, with the base on the bed.
13. Key: print 5 of this file, with the largest part on the bed. No supports.
14. Coil: coil part on the bed; set ON tree supports.
PAINT INSTRUCTIONS:
Coloring all the pieces isn't complicated, even if you've never done it before.
All you need is:
- A couple of sheets of fine Sandpaper (400 grit is fine);
- A Primer: if you don't use an airbrush, use the Color Primer by The Army Painter, otherwise the Surface Primer by Vallejo for Airbrush code 70.600 White is excellent;
- Acrylic paints: I mainly use Vallejo. If you want to use a brush to paint everything, you will need a tube of Bloody Red code 72.010, an Artic White code 72.002 and a Silver code 72.052.
If instead you use an airbrush, since you are not a beginner, I leave the choice of bright red and silver up to you. However, you will still have an easier time just marking the Coca Cola writing with a brush.
- Brushs, a very thin one for the coca cola writing and a wide one for everything else. Or Airbrush, if you have one!
- Acrylic Gloss Varnish by Vallejo for the final protective layer.
When you have printed the part, give it a light pass with the abrasive paper to eliminate impurities, then pass a couple of very light layers of Primer. Go over with the sandpaper once again (you will have eliminated some visibility of the Print Layers) and apply the last layer of Primer.
Color the piece with the colors detailed below and once dry, pass it over with a transparent film to protect.
Done!
ASSEMBLY INSTRUCTIONS:
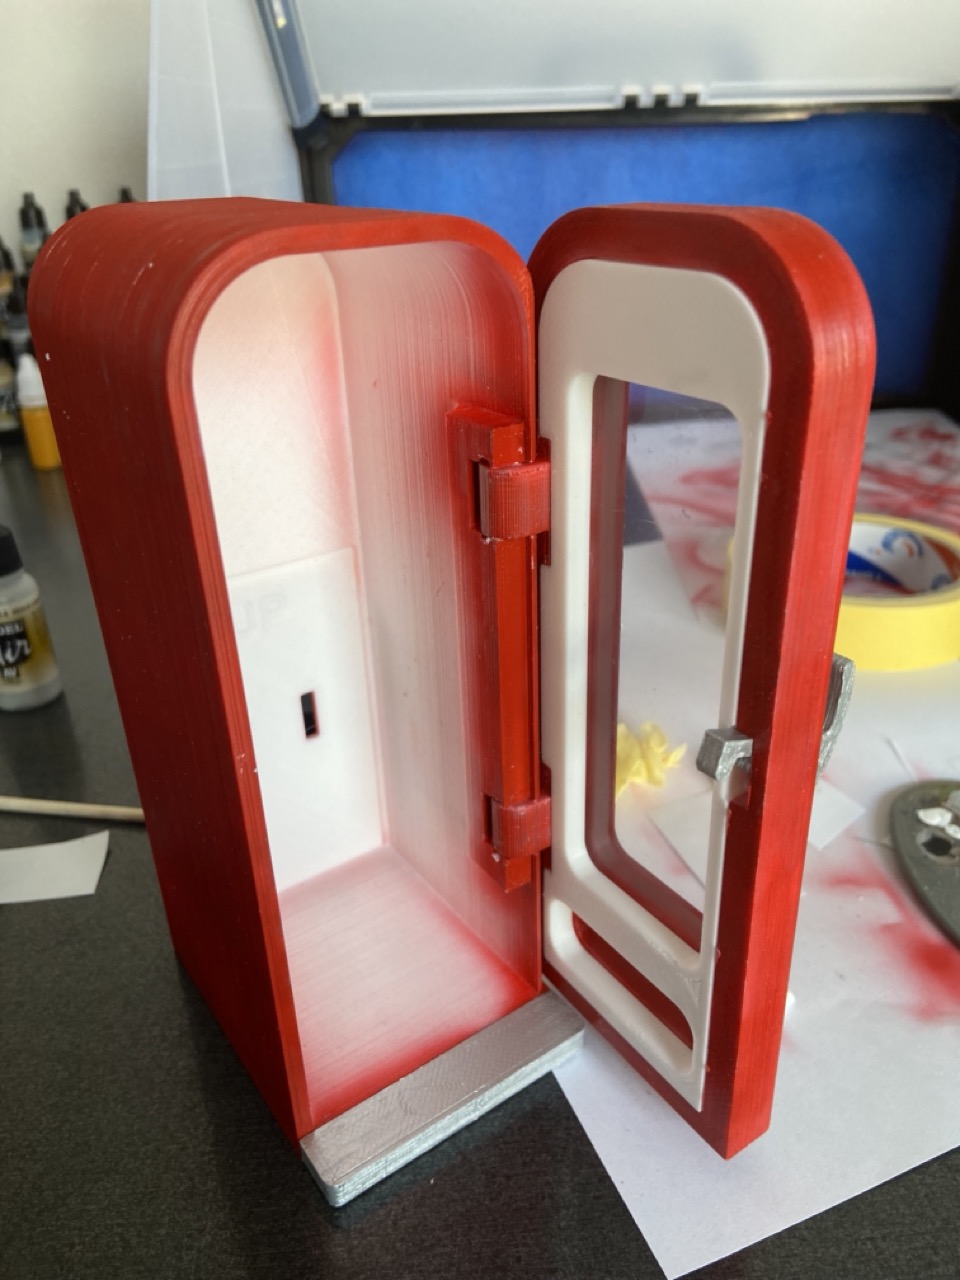
Figure 1. Connect the pieces Body Inside Rear & Body Inside Front; apply a few drops of Loctite SuperAttack glue on the joints.
Figure 2. Insert the "Body Retro" part with the part with the writing "UP" facing upwards and the inside of the Body Main.
Secure the two pieces with a few small drops of glue applied to the outer edges.
If you have decided to color the piece, it will need to be painted now before continuing with the assembly.
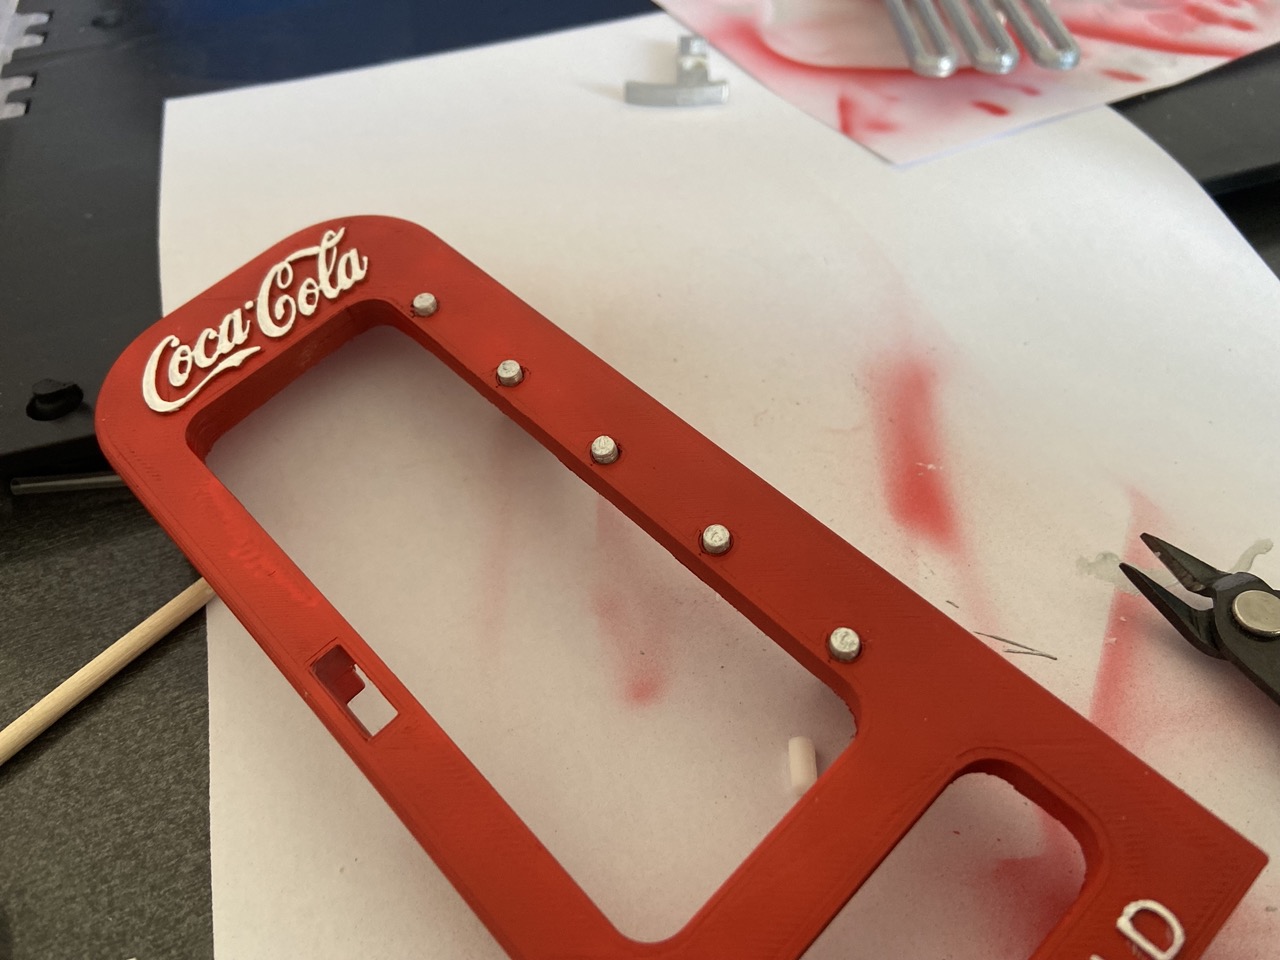
Paint the entire part that will remain visible with bright red (follow the photographic images for details).
There is no need to paint the internal part.
Figure 3. Insert the two "Door Pin Up & Down" into the slots on the "Door" part and secure them with a drop of glue.
If you have decided to color the piece, it will need to be painted now before continuing with the assembly.
Use a bit of plastic putty to fill the spaces between the glued pieces as best as possible (at least for the visible external part), try to smooth as best you can with fine sandpaper and apply a good primer.
Then paint the entire part that will remain visible with bright red (follow the photographic images for details).
There is no need to paint the internal part which will be covered by the "Door Inside" file.
Finally, color the writing "Coca Cola" with white.
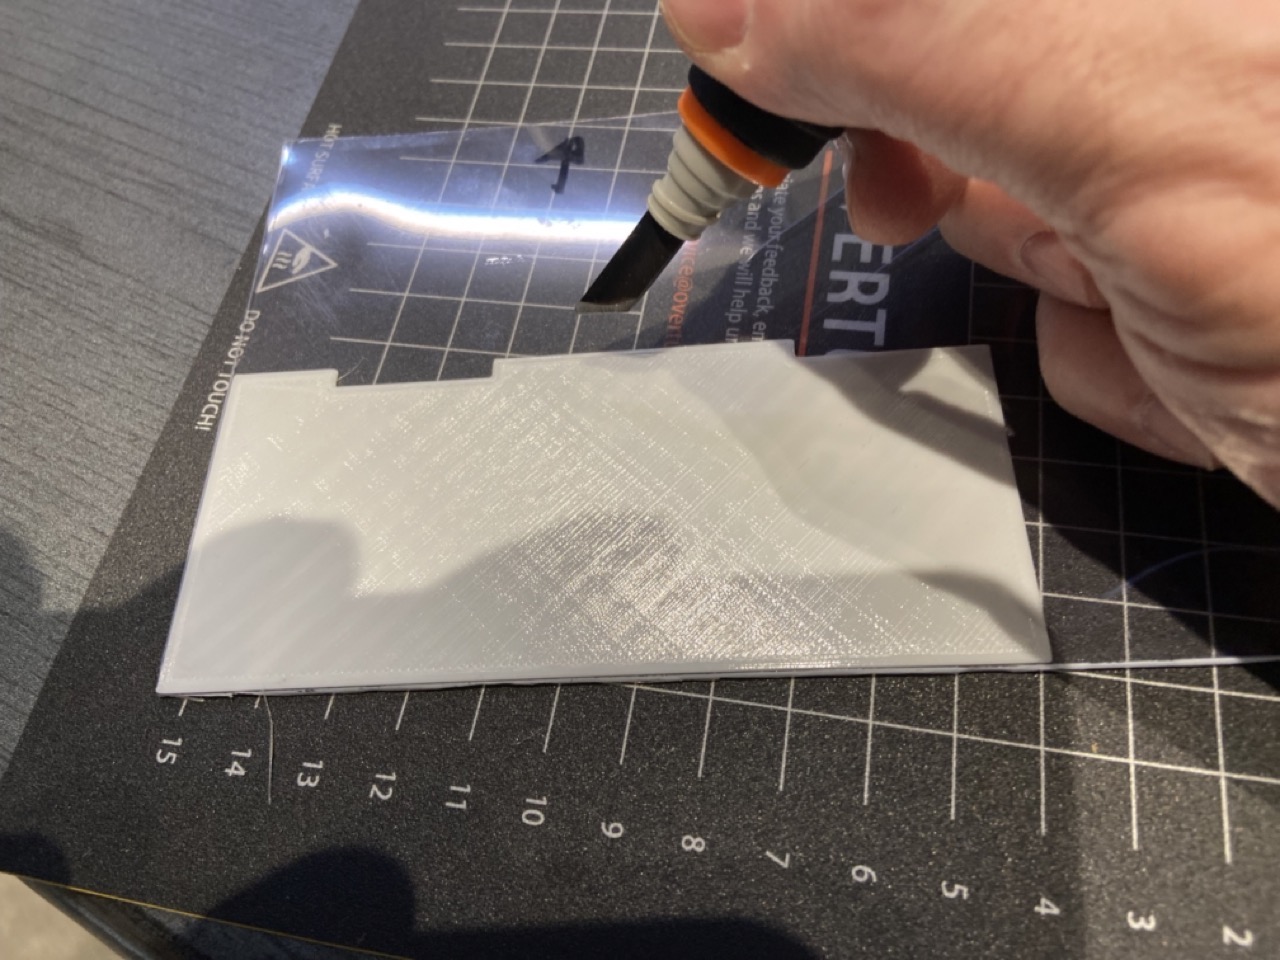
Figure 4. Take the semi-rigid transparent plastic sheet and place the "Glass Template" template on it.
Using a cutter, mark the contours and trim well with modeling scissors.
Don't worry about not being too careful: the edges will be hidden.
Figure 5. If you have decided to color the Set, paint the "Handle" file with a silver color.
Insert the handle from the outside of the door towards the inside.
Figure 6. Enter the Handle Pin from inside; you will have to move the handle a little to access the Pin housing well.
It is not necessary to paint that area or the Pin.
Figure 7. Once the Pin is positioned correctly, press outwards so that the Pin fits into its housing.
At this point the handle can move up and down.
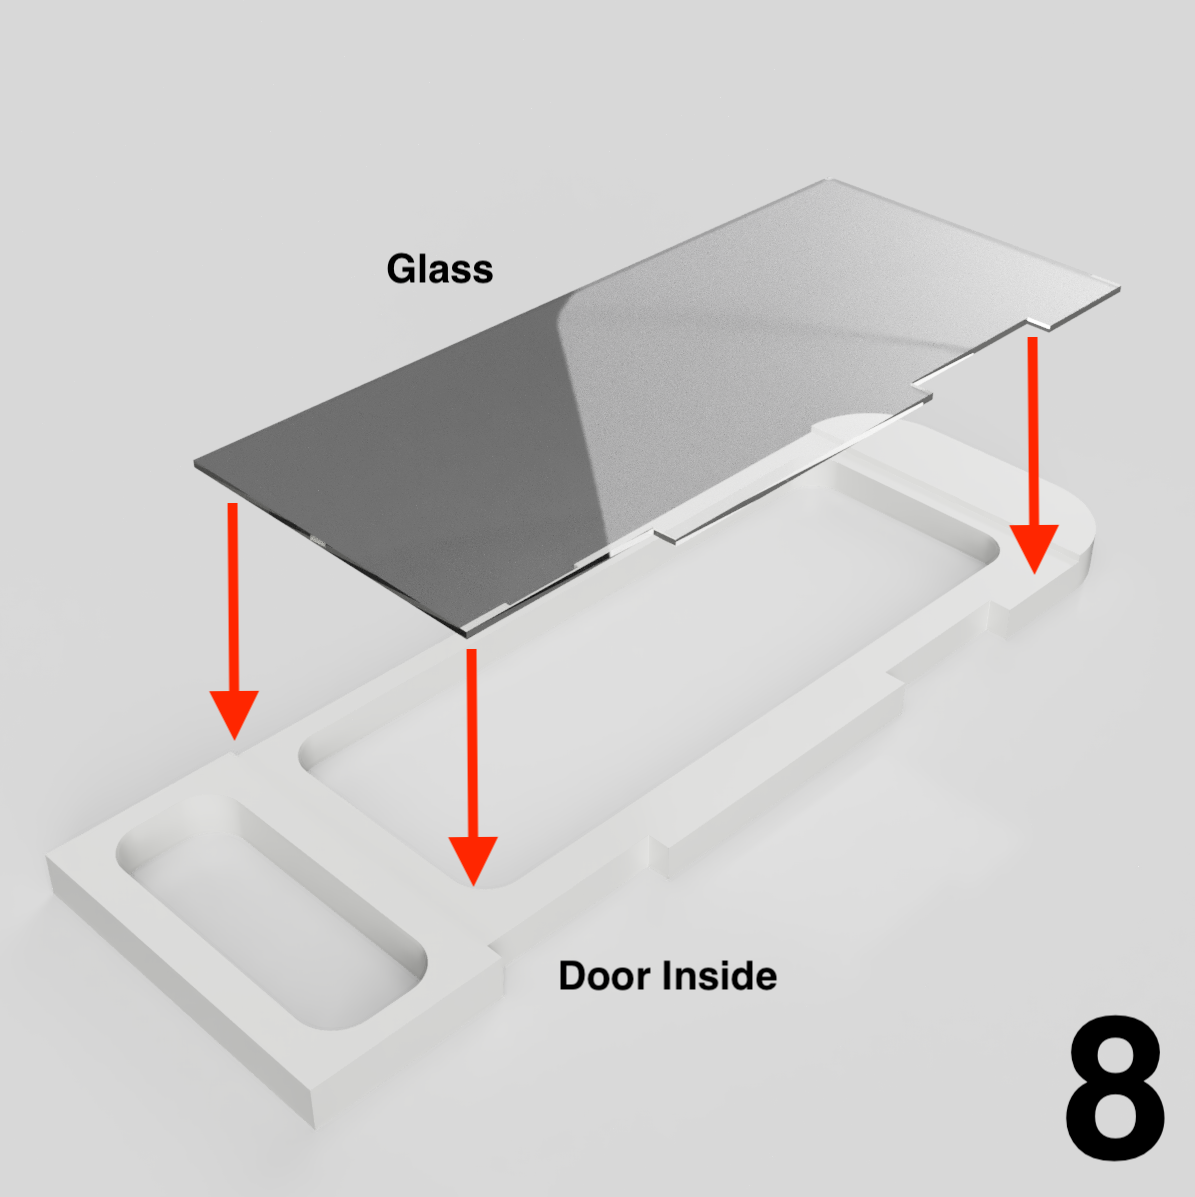
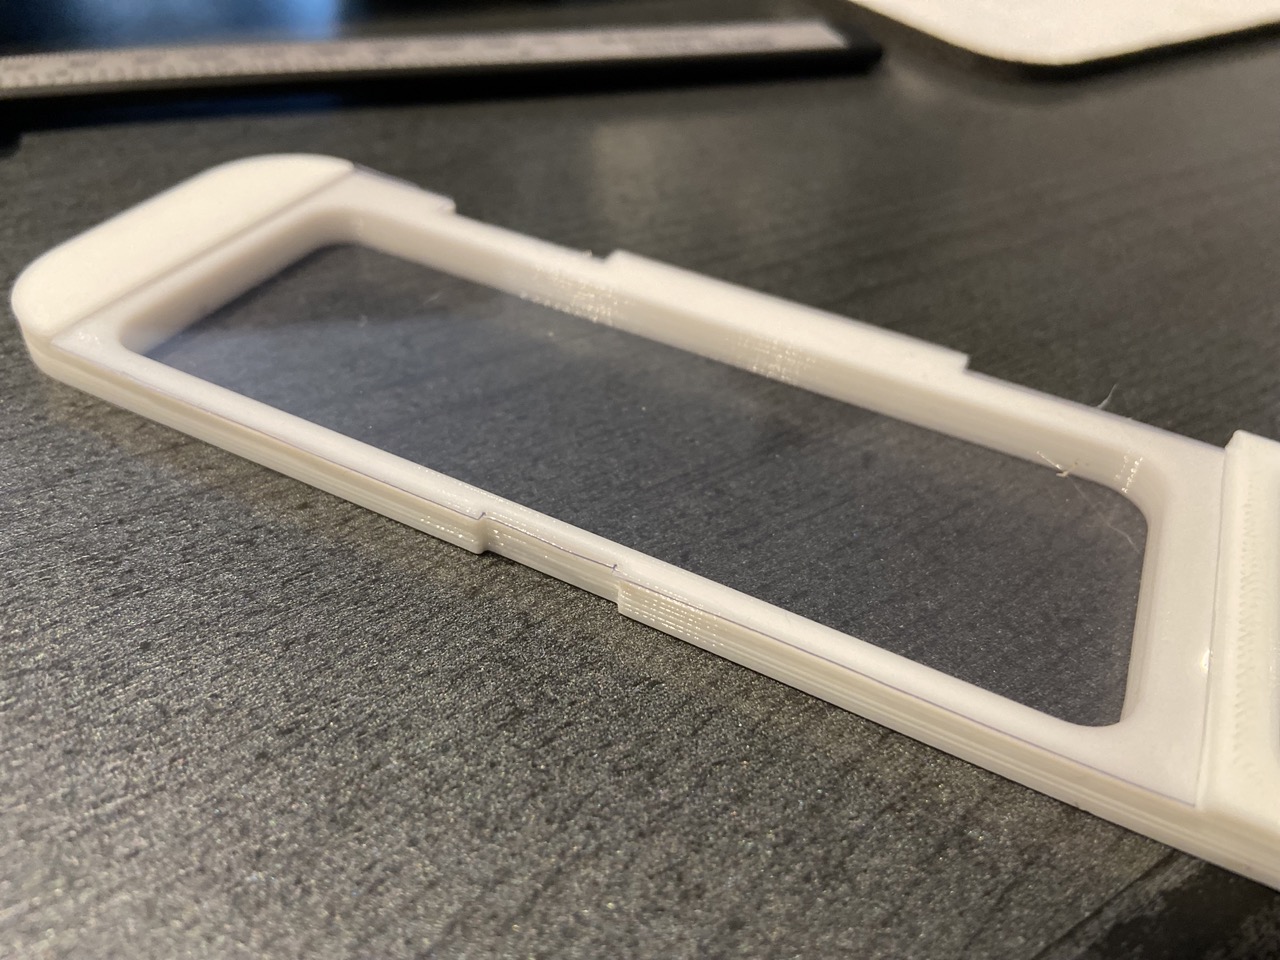
Figure 8. Insert the piece of clear plastic you modeled earlier into the "Door Inside" file slot.
It is not necessary to use glue, because everything will be blocked later.
Figure 9. Insert the last part into the door from the inside.
Use a few drops of glue at the contact points to block everything.
Be careful not to place the glue too close to the transparent plastic because it could damage it.
Rather than risk it, only apply glue to pieces that have already been inserted.
This operation will also permanently block the handle mechanism, so be careful not to put glue in that position.
Figure 10. If you decided to paint all, the keys must be painted with silver color like the Handle.
Insert all the 5 keys in their holes.
Use just a few of glue to fix them.
Figure 11. Connect the already painted base as the handle to the main body.
The slightly rounded part must be oriented downwards.
Use a drop of glue to secure the two pieces.
Figure 12. Insert the Door in the Main Body. Passing the pins from inside the main body, there are two prompts to facilitate insertion.
Apply good pressure to both hooks at the same time until they are in their place.
Depending on how much color you put on the two bodies, you will probably need to open and close the mail a few times to get a smoother movement.
Test the closure of the handle. If you have done things correctly, it should work great.
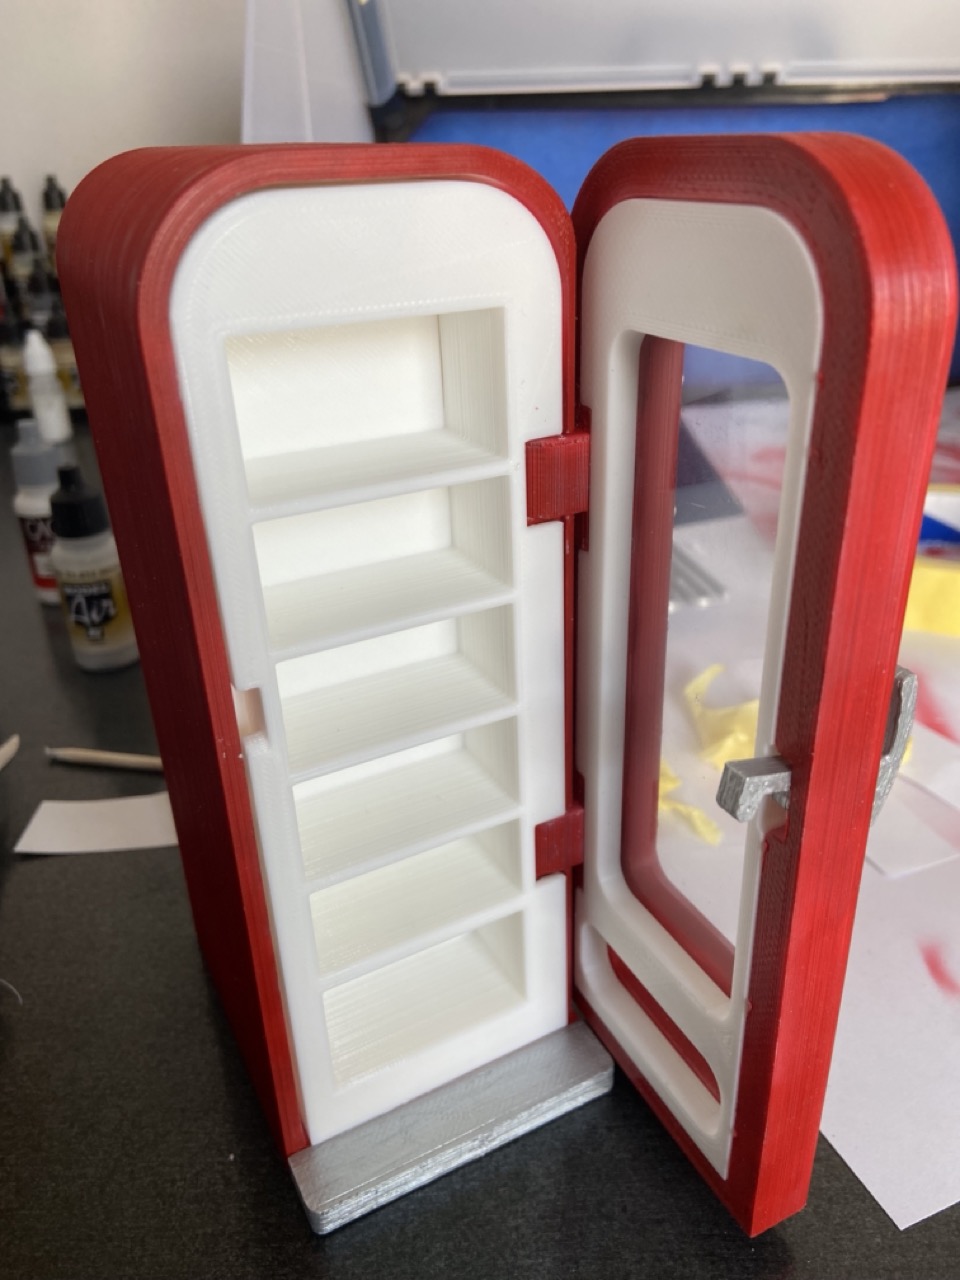
Figure 13. Insert the White Body in the Main Body.
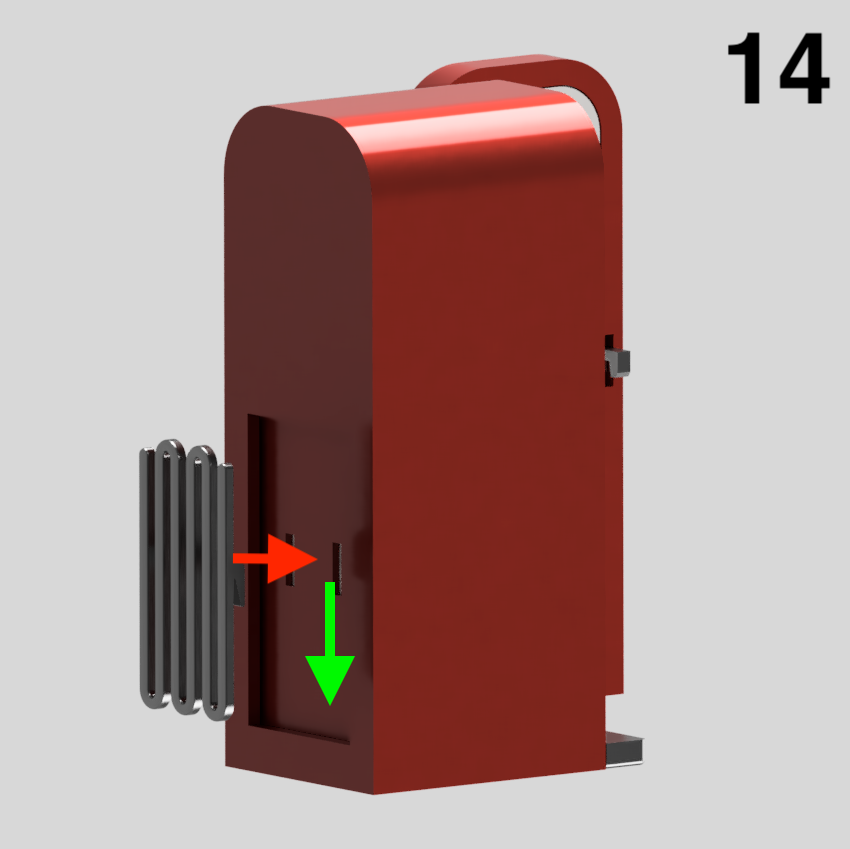
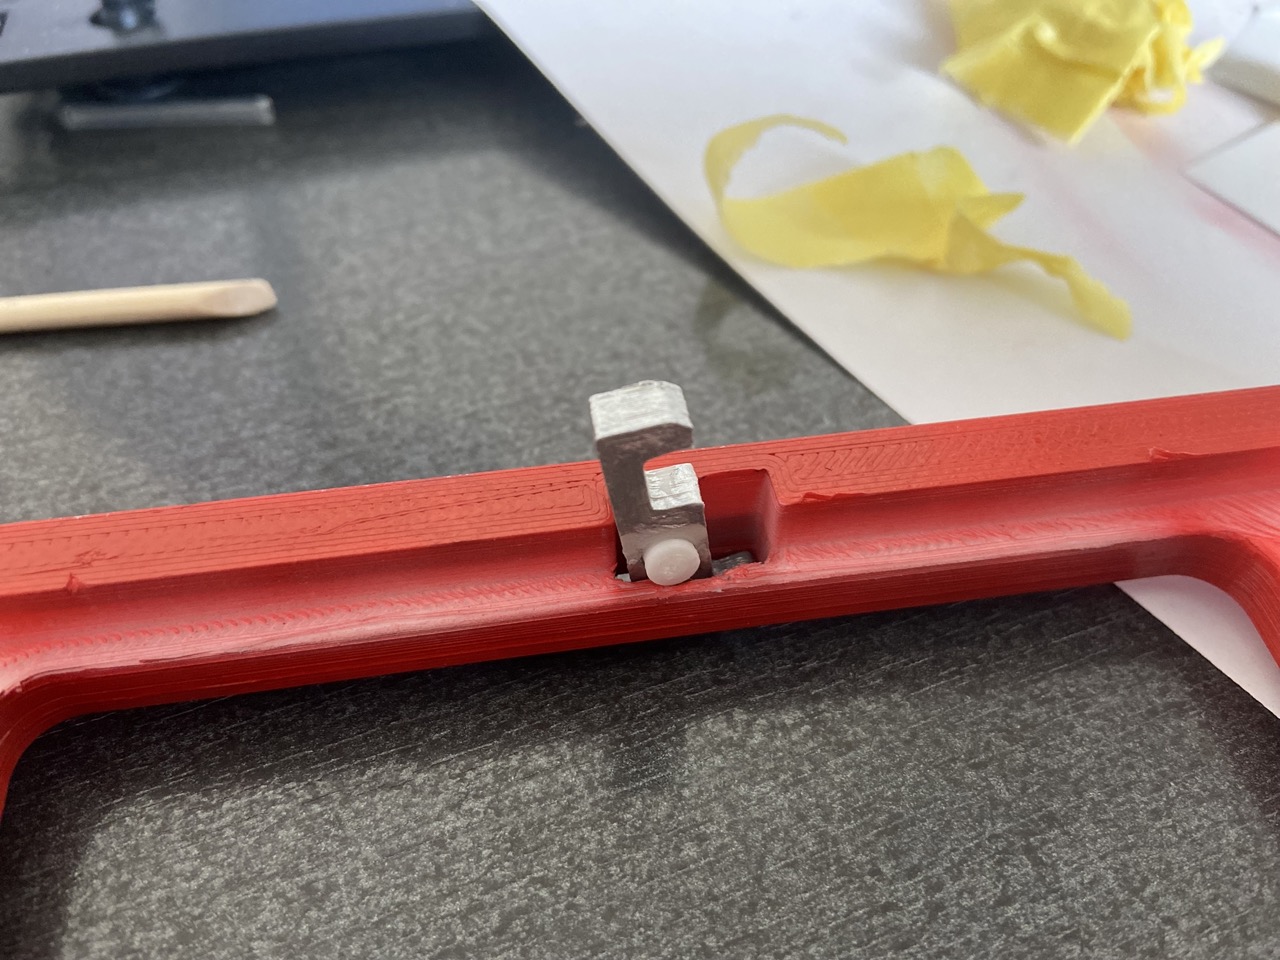
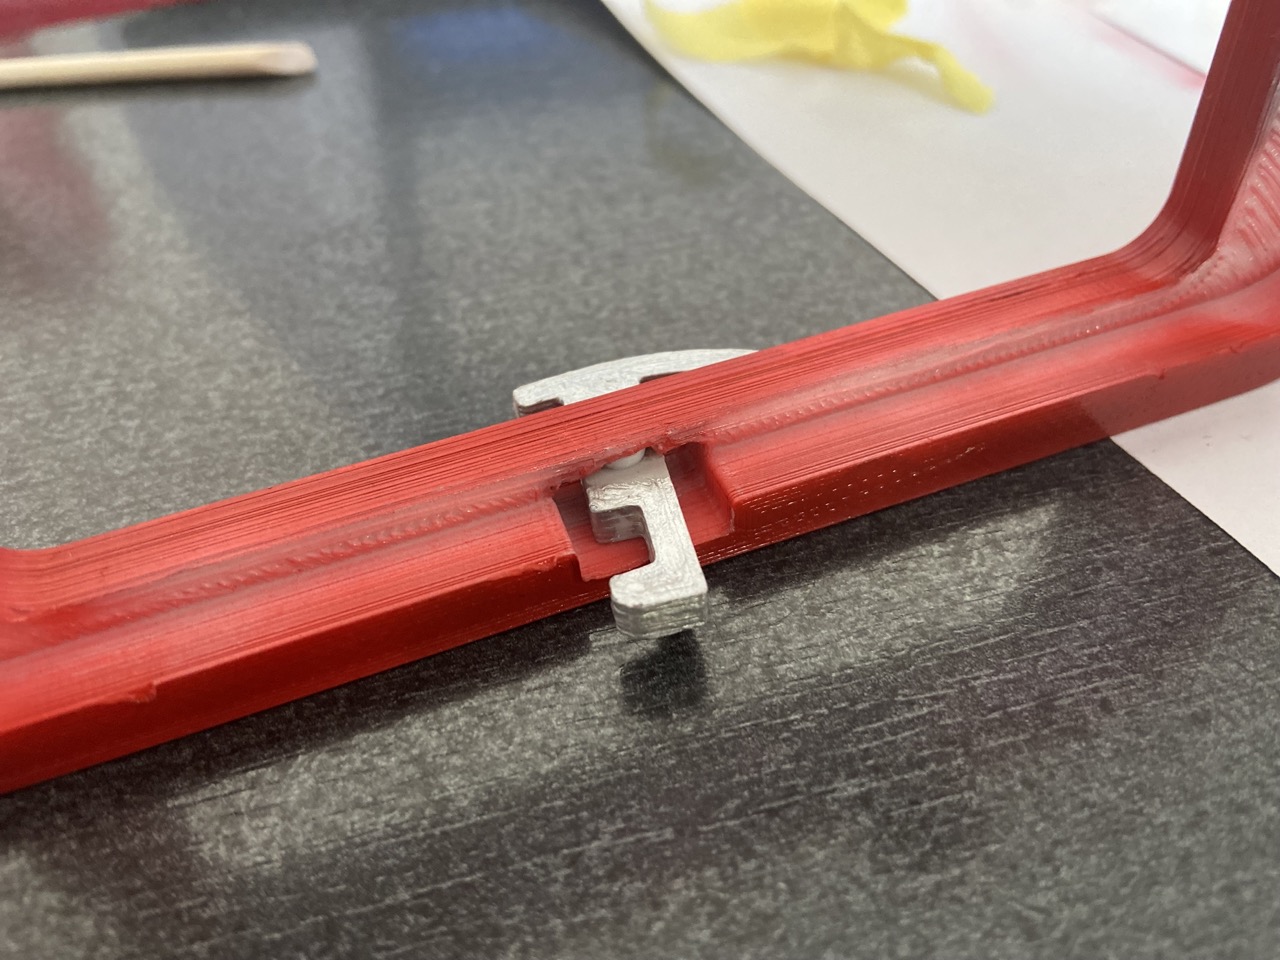
Figure 14. From the back, insert the Coil and slide down to lock everything.
When you want to extract the WHite Body again, just slide it upwards.
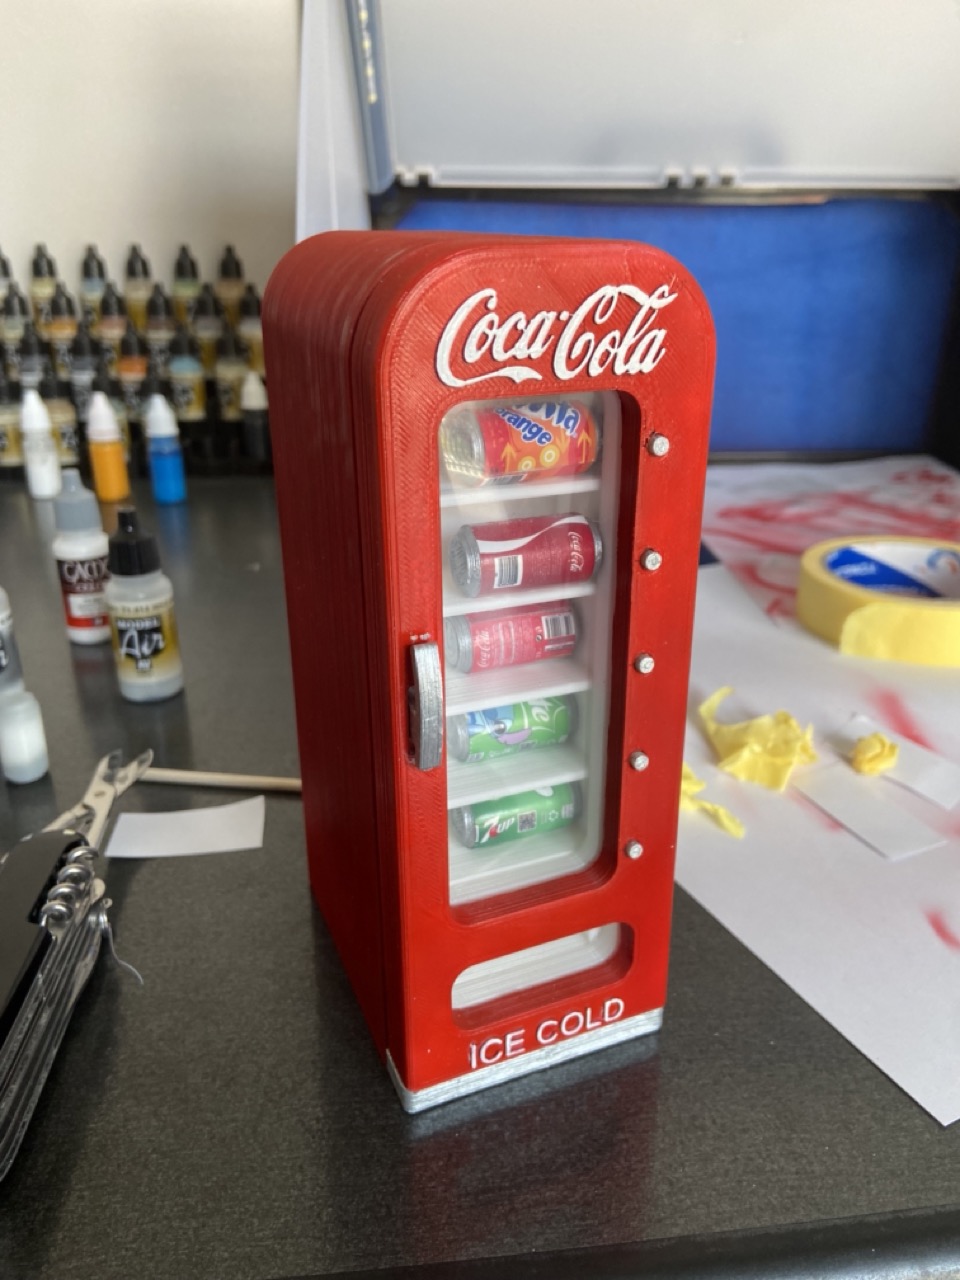
At this point you can think to the Cans...
Once you have printed and colored them, all you have to do is label them with your favorite drink.
There is already a PDF sheet ready for printing with 6 different types of labels; print them on adhesive photo paper, cut them out and glue them to the cans.
However, I suggest you also use a little glue to optimize the grip of the adhesive paper on the can.
Once the stickers are positioned, cover them with a layer of protective transparent, let it dry and then place them wherever you like.
Don't forget to share your print, give this project a like and have fun!!!!
:format(webp)/https://fbi.cults3d.com/uploaders/17749328/illustration-file/f876cbd8-255f-460c-a9a1-d0f74b008713/Main.jpg)


/https://preview3d-images.cults3d.com/67u2ex3o2yehp2b8qhntxeyhch5k)
/https://preview3d-images.cults3d.com/g5u1o62uurkddqpd8plvkdk6663i)
/https://preview3d-images.cults3d.com/dog9bnriezx6si97o126i7qigxzr)
/https://preview3d-images.cults3d.com/bosqk5l1ossik529wqj2988uli6g)
/https://preview3d-images.cults3d.com/oea2w64v2d1cpluv72v733ct6e3t)
/https://preview3d-images.cults3d.com/iz189e7qc7w1z1w8co5w3bb8k95n)
/https://preview3d-images.cults3d.com/746092ftiikwx5ypuex0h1lzu7eo)
/https://preview3d-images.cults3d.com/bt9a3mulv3cw9vwrubhjv1r38549)
/https://preview3d-images.cults3d.com/0m9rfyk4i2f1p0i4gn0jhmq1raot)
/https://preview3d-images.cults3d.com/werl5qy09aqfyjjuvfpn7difaash)
/https://preview3d-images.cults3d.com/mfd474kkicvz54lwsnvjjkb5mzw7)
/https://preview3d-images.cults3d.com/tm4z70wxhpmqd59mt942p8etel94)


