LED Glass Raiser with AMS Stilts and QuickVent

LED Glass Raiser with AMS Stilts and QuickVent

Boost
24
42
10
GIF

Print Profile(1)

All
X1 Carbon
P1S
P1P
X1
X1E
A1

0.2mm layer, 4 walls, 20% infill
21.5 h
9 plates

Boost
24
42
10
2
40
4
Released

Description

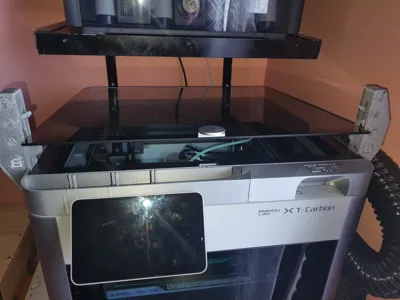
I wanted a glass raiser that was easy to modify, sparse on filament and with no large parts that would cause headache in case of failed prints or tweaks in design. I also wanted it to be somewhat modular in case of different needs or preferences in the future.

Therefore this glass raiser for Bambu Lab X1C.


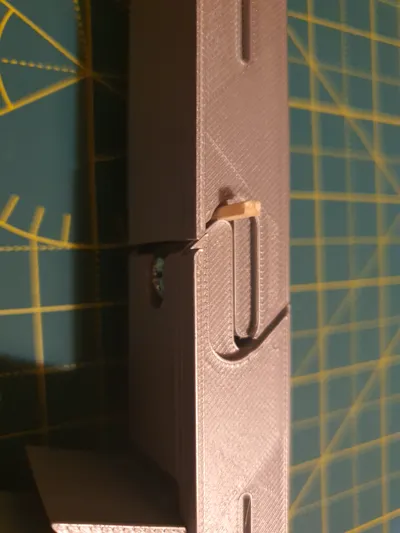
  • AMS is lifted with 6 stilts that are dovetailed and bolted to the riser. These can easily be replaced and are designed to be printed without support. There is only one orientation that will work, choose the side where the AMS groove is in contact with the bed.
  • 45° angled LED strip groove with corner pockets for more easily bending the strip in the corners. Small plug in corner to allow for cable exit, no need for soldering.
  • 4 main corner pieces that are bolted together.
  • Two piece front panel, which is dovetailed in place. Front panel with slot for Bambu scraper and opening for buttons.
  • TPU gasket which also serves as a cap for the LEDs so not blinded by the lights from above.
  • Venting mechanism is in the front of the raiser. I designed it to be partly bolted by a M2 bolt, but ended up not using it. Mirror all parts for left side version.
  • Glass storage below the AMS.

No supports needed! (except for one small part for the mechanism)

I had to set surprisingly tight tolerances for all the parts, however it came together perfectly for me.


I used COB led strip from Pautix: https://www.amazon.com/dp/B08X1QMRKK?ref_=pe_386300_442618370_TE_sc_as_ri_0&th=1

The LED lip is 9mm wide.


Bolts used:

  • 4x M4x16mm with locknuts.
  • 6x M4x20mm with locknuts.

There is a recess for the nuts, so only a screwdriver is needed.


Stilts printed at 4 walls/top/bot surfaces at 30% gyroid infill.

Don't remember exactly what I did for the main corners, but these should also be printed fairly strong.

Front panel and venting mechanism at default settings.


Please be mindful of where you put the seams for smooth assembly and rotation of moving parts.

This is especially crucial for the venting mechanism.


Printed in PETG. I recommend doing some small testprints to check that fitment is OK.

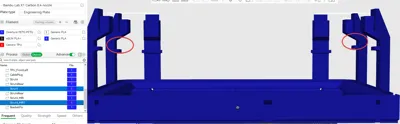
I added a step-file of assemblies and some individual parts. For assemblies open in studio and use “Split to Objects”, then lay out the parts on the number of build plates needed.


Disclaimer:

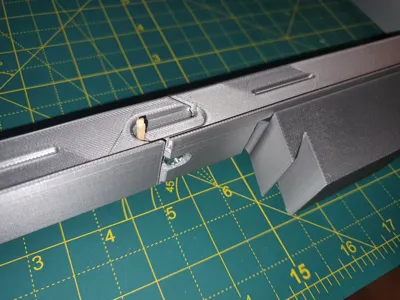
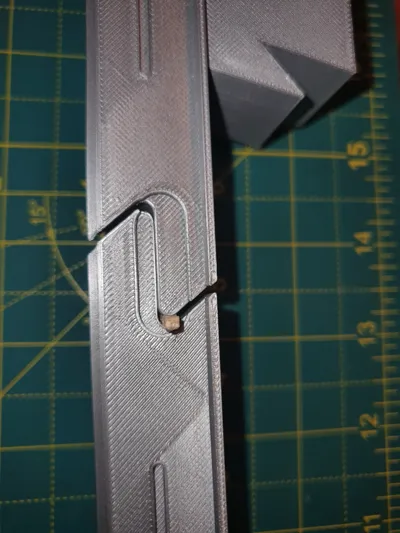
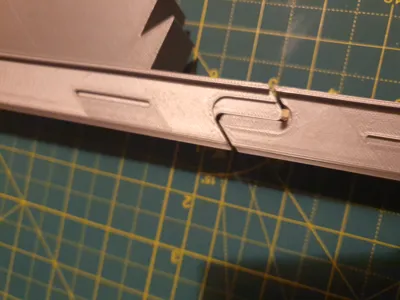
I did have to do some small shavings here and there for the assembly, caused mainly by rough corners and seams.

I also installed a small keeper pin in the back to keep the glass rest straight due to some bending of the material causing a tight fit for the glass. Doing this I had to replace a M4x16mm with a M4x20mm. Print this only if needed.

Comment & Rating (10)

Please fill in your opinion
(0/5000)

Boosted
I liked Idea very much. especially those automatic Lid stoppers. Even if they look a bit weird on printer :) This Print was full of new experience and experimenting for me. Done it with Bambu ABS (Silver) what was very first so big job with ABS for me. I was very worried as I know that ABS isn't easiest material to print with, but surprisingly it went out easy and very good with no warping or so. One thing - I was using mouse ears a Lot probably they did a good Job here :) . Printing with TPU was my 1st experience as well. But had no problem there as well. As You can see in photos, I didn't do a AMS supports. I don't need them as I have done separate shelf for AMS. My main need was raiser for LED strip and Lid opener. So I did get rid from AMS support groves as well. But I'm going to make a profile later today as it all works. Now some negative things. I'm not completely sure, probably it is effect of ABS but I had one issue with the model. It didn't fit my Top Lid Glass on wide side (X axis). And that was for about 2mm (maybe a bit less) So I had to widen a screw holes in front and back to separate left and right parts for approximately 2mm. Other small thing is very, very tight fit for the parts. Some people can find a very difficult to put parts together. So if You ar going to print this model, You have to be ready for some postprocessing work. Sanding and Shaving. Other of that I'm very happy and it works for me now like a charm. Sad My Led strip have lost on delivery from Amazon and I have to wait again.
(Edited)
The designer has replied
1
Reply
@warlogh Thank you for your detailed review, and for sharing your make! I do like the Silver ABS, and the clean look without the stilts. I agree the mechanism look a bit weird :) but its function is very convenient. I find it odd that the x-dimension was off by that much.. Could it be due to shrinkage? (I have NO experience with ABS..) Was the glass interference just on the middle? The stilts have a lip which helps keeping the sides apart. Could be that removing these introduced an issue..? This was my first design and print after receiving the X1C, and as stated in the description i was amazed by how tight I had to set my tolerances. I ran default generic PETG settings and Automatic Flow Dynamics Calibration. I initially set the "default" 0.2mm gap, but that was way too sloppy. Also, for the amount of shaking this machine produces I had to make sure the fit was snug. I did have to cut away some misplaced seams and blobs, but this was mainly on the front piece. For others attempting this print I suggest doing a test print of mating parts. Cut out in CAD or add a negative part in the slicer so you only print as minimal amount of filament as possible for the test. I believe I set the tolerance as a global variable, so should be fairly easy to change the model.. Might upload a looser fit step-file if this is an issue for others as well. Glad it worked out for you eventually. The print looks great and thanks again for sharing!
0
Reply
Boosted
Replying to @KG3Dee :
No prob. Anyway you did a good job here. Nice model. The thing about that Misfit on wide side as I said could be related to ABS, probably I did something wrong, no Idea why this happened so and why it was only on wide side and other one was absolutely ok. I Agree about Bambu Silver ABS. It looks like native Bambu's printer colour and if You are not looking on it you may think there is nothing extra put on the printers top :D . But My choice wasn't because of that. Why I choose this ABS filament for the job? Very simple. I have a lot of PLA and only few rolls of PETG in some Toxic colours (never used one yet) one ABS (this one) and one ASA (green one). PLA I dropped right away as I don't believe it is suitable for this Job here. PETG and ASA were totally rejected because of colours so this roll of ABS were only clearly choice. No regrets here at all :) . As you can see I made a Profile here. Done it without any changes I made for myself, so profile is completely from original source.
0
Reply
It looks like in the MainAssy.stp, on the strut at the side back left, the glass holder part is lower than the front two and the one on the side back right. Is this on purpose? Would printing 2 of the left ones fix the issue? Since the 2 all the way at the back are also lower, I assume it's supposed to be the lower ones at the side rear? Hopefully this wasn't too confusing. I included a screenshot showing where I'm talking about and with the two objects selected.
The designer has replied
0
Reply
Based on your screenshot the right one looks wrong. You can copy and mirror the left one, and it will be correct. The glass rest is slightly angled to keep the glass in place, and should be lower in the back. Not near my computer right now, but will fix the model assembly when I get the chance.
0
Reply
Replying to @KG3Dee :
I had a feeling that would be the case. Thank you!
0
Reply
I don't know if it was intentional or not, but the actual riser body itself(MainAssy) is corrupted. Loading it into BLS doesn't bring up anything and it's a 0KB file. Would love to use this, so fix when you can please.
The designer has replied
0
Reply
Not intentional. Re-added the step-file now.
0
Reply
The basic structure works great and printed well, the mechanism for opening a dclosing the lid was a bit fragile. already broke the hindges, could be cool to use metal Dowls there as an option.
0
Reply
Whould it be possible to add 3mf file with arranged build plate? For some reason if I try to open the MainAssy.stp file BambuSlicer just crashes, tried it on ocra slicer, same result.
0
Reply
No more