40mm Fan BIQU H2 Mount wBLTouch
40mm Fan BIQU H2 Mount wBLTouch


Print Profile(0)
No Print Profile yet. Add one to earn points.
Description
40mm Fan BIQU H2 Mount wBLTouch
I was really not happy with my previous design (https://www.printables.com/model/183260-ender-6-biqu-h2-mount) which was based on 3DPrintBeginner’s design. I wanted a compact, all-in-one, mount for the BIQU H2 and BLtouch. When I saw Windischb’s single 5015 BIQU H2 mount for ether a 40x10mm or 50x10mm fan. I felt I had found the perfect mount. I liked that it included the BLtouch in behind, it used the space behind the H2 to channel air from a blower fan saving space on the Y axis depth and eating into available Y print volume. Unfortunately I found it difficult to print and the part cooling performance wasn’t as good as I’d hope. I ensured there were no gaps around the part cooling exhaust ring.
So I went back to the drawing board and designed this new compact mount. There are three versions, 35mm stock fan, 40mm, and 50mm hotend cooling fans. It is smaller, more compact, and surprisingly very rigid when compared to my original design. It is also compatible with the BLtouch mount from Windischb’s design, all though it isn’t required and would be a bit of overkill.
I am still not entirely satisfied with the design but am overall much happier with it. The first is that it still reduces the Y axis print volume to 240mm when using a front mount 5010 blower for part cooling. And second the 50mm fan version is also not compatible with most front mounted 5010 fan part cooling solutions. A compatible remixed fan mount and duct can be found below.
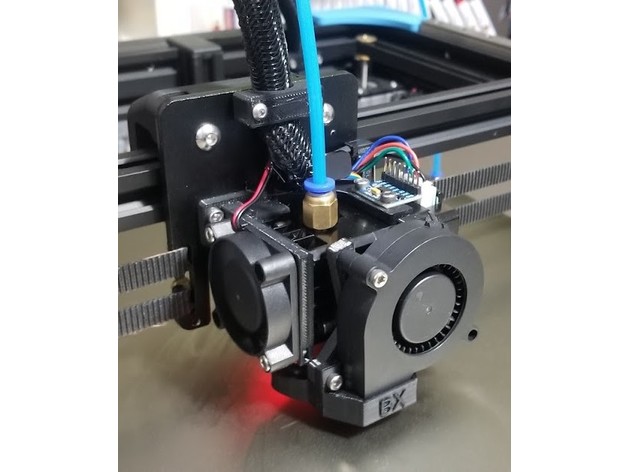
Note: 40mm version shown in action.
Pros
- Direct drive conversion
- +10mm in X axis build volume (260mm total)
- BLtouch mount
- Accelerometer mount
- Compact and clean
- Good cable management
- Very rigid
Cons
- -10mm in Y axis build volume (240mm total)
- Have to remove H2 before removing the mount
Links to the 35mm and 50mm versions
35mm Stock Fan BIQU H2 Mount wBLTouch https://www.printables.com/model/183254-35mm-stock-fan-biqu-h2-mount-wbltouch
50mm Fan BIQU H2 Mount wBLTouch https://www.printables.com/model/183256-50mm-fan-biqu-h2-mount-wbltouch
Additional hardware required
See colour coded diagram images for locations.
40mm Fan BIQU H2 Mount wBLTouch
H2 and Fan Mounting:
- (yellow) 2 x M3x8 attaching mount to X axis plate
- (blue) 2 x M3x6 H2 top mount (optional 2 x M3x8 if using accelerometer)
- (blue) 2 x M3x6 H2 fan mount
Fan Mounting:
- (green) 2 x M3x12 40x10 fan mount
- (green) 2 x M3 Hex nut 40x10mm fan mount
Optional:
- (red) 2 x M3x16 BLtouch mount (optional)
- (red) 2 x M3 Hex nut BLtouch mount (optional)
To complete the setup I’m using, I used the 40mm version from above along with the following fan mount and duct (https://www.thingiverse.com/thing:5170117) and a 24v 5015 blower fan. I also created a reverse Bowden mount to finish things off (https://www.printables.com/model/183259-ender-6-reverse-bowden-mount). This will also work with the 35mm version.
Install Instructions
- If using a BLtouch.
a. Attach the BLtouch to the mount with the ribbon connector facing towards the back of the printer using (red) 2 x M3x16 and 2 x M3 Hex nuts
b. Connect the BLtouch ribbon cable 2. Insert the (green) 2 x M3 Hex nuts 3. Now secure the mounting plate to the X axis plate on the Ender 6 using (yellow) 2 x M3x8 and use the screw locations for the top two mounting points of the stock hotend shroud. Be careful not to damage the X axis endstop or BLtouch cables. 4. Attach the BIQU H2 to the mount using (blue)
Note if you’re using an accelerometer, substitute the top mounting M3x6 screws with M3x8 to secure the accelerometer and H2. For the 40mm or 50mm mount, use 2 x M3x6 to secure the H2 to the fan portion of the mount and 2 x M3x6 for the H2 top mounting holes. 5. Finally we can security the hotend cooling fan. If using the 40mm fan, use (green) 2 x M3x12mm to secure it with the fan lead facing up towards the top.
Recommended Firmware Settings (Klipper)
[stepper_x] position_endstop: 260 position_max: 260
[stepper_y] position_endstop: 240 position_max: 240
Optional settings with BLtouch
[safe_z_home] home_xy_position: 115, 112 # bltouch to bed center
[bltouch] x_offset: 16 #bltouch offset from nozzle y_offset: 26 #bltouch offset from nozzle z_offset: 0 # temp value to prevent collision
[bed_mesh] speed: 100 horizontal_move_z: 10 mesh_min: 20, 30 mesh_max: 240, 250 algorithm: bicubic probe_count: 5,5 Print Settings ==============
Printer Brand:
Prusa
Printer:
I3 MK3S
Rafts:
No
Supports:
No
Resolution:
0.2 mm
Infill:
20
Filament: Generic PETG Black
Category: 3D Printer Parts