Playstation lamp (6 colors and 1 AMS explanation)
Playstation lamp (6 colors and 1 AMS explanation)


Print Profile(1)

Description
This is a guide on how to print with more than 4 colors using only 1 AMS (6 colors in this example)
Im using this Playstation lamp I designed as example. The lamp looks like this one ( https://makerworld.com/en/models/93103 ) but only the concept, the design was made from scratch in Fusion 360 (you can download the file if you want). It has some improvements over the original, like zip ties holders to keep the LED strip in place, holes for screws on the back cover, and hole for a DC connector.
Ive used the remaining of the LED strip from the AMS riser with light. In my case was 5mm wide COB LED strip 5v.
Problem: if you want to print more than 4 colors, your AMS will not be able to. Maybe you could do it from the external spool feeder (I didnt tried) but you would have to change the spool on every color change, which is A LOT! But also will need much more time, as it will pause print while you make the change.
Solution: with this method you will be able to print more than 4 colors, the AMS will make the color changes without pausing. At the cost of some previous planning, and exchanging some of the spools while they are not being used.
Planning: you will need to plan the color order, as consecutive colors can not be used in the same AMS slot. Here are the steps needed:
Preparation
- Import a STEP or 3MF file into Bambu Studio (or OrcaSlicer). The model imported will need to have PARTS (each one of this parts can have a different color). How to create such a file is object to another tutorial, but in short, if you use Fusion360 create your model with separated “bodies” for each color, and then export your model as 3MF. When you import into Bambu Studio it will ask you if you want to as single object with multiple parts (each part is a body from Fusion).
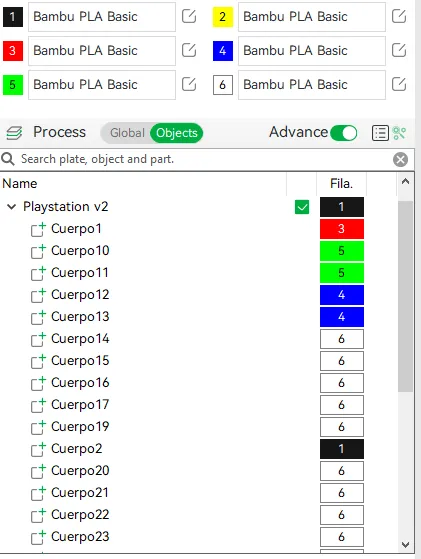
- In Bambu Studio add as many filaments as your model needs. Choose appropriate color for each filament.
- Set all the print settings, enable “Prime tower” in “Others” print settings (usually default on)
- Go to the “Objects” tab and select the color of each part
Color order
- Slice the model, go to preview tab, click the single layer view (bottom right icon) and move the slider to the first layer
- Create an Excel file so you can write down the color orders
- We are in the first layer, the order is as following:
- in the prime tower, the first color is the one that is missing (RED)
- second color is the one on the bottom (YELLOW)
- continue with next color up to the top. We will write each following color in order from first to last (..BLACK-WHITE-GREEN-BLUE)

- Now we go to the second layer using the slider, the colors in the prime tower will be different and we need to note them down in the same way as we did on the first layer (starting with the missing color first, then from bottom up). In this case: BLUE-BLACK-WHITE-YELLOW-GREEN-RED

- Do the same with all layer, one by one. (In the Playstation lamp example we only have 3 layered colors, so the light can pass through).
If you did all the previous steps you should end up with something like this (double check your wrote the colors in the correct order!):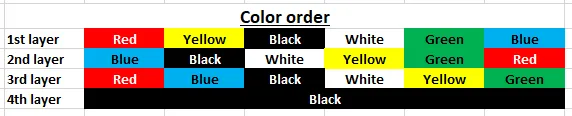
Color compatibility
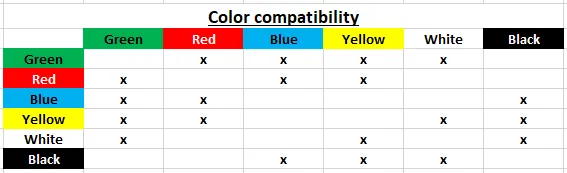
Now is time to check color compatibility. Each color must be placed in an AMS slot, but you have more colors than slots.
The trick is that the “next color coming up” can not share the same slot of the current color. So what you will do is another Excel table where you will write all the colors, one per row, and again all the colors, one per column.
- You will start from the first color in the first layer and th color coming up next. Write an X on the matching colors, one on the rows and one on the columns. That means that both colors can not go into the same slot
- Continue with second and third color, again mark down in the table with two X one in the rows and one in the columns where the colors meet.
- You should do this all the way until the last color in the last layer
- You will end up with something like this:
AMS Slots
With the color compatibility table you can assign slots to colors:
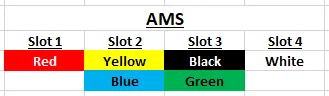
- Prepare a new Excel table for the slots :)
- The first slot should accommodate the first color of the first layer
- Second slot should hold the second color of the first layer
- Third and fourth exactly the same
- Now the “difficult” part is to check the fifth color where it could be placed, using the color compatibility table. Place the color in the slot that can have both the 5th color and the one that is already there
- Do the same with the sixth and so on. You should have the colors arranged like this:
Send job to printer
You will need to tell the printer where are the colors located.
- In the “Device” tab choose the materials and colors for you AMS

- Then you can send the job to the printer, and it will ask you to assign the AMS slots to the colors you have in your model
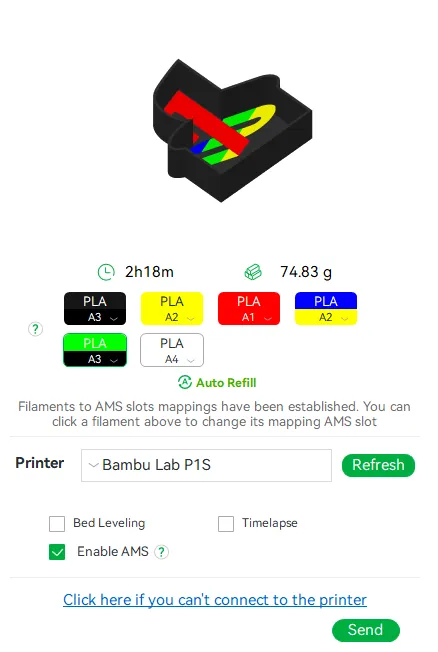
- Choose which slot correspond to each color (use the AMS slot table). Some colors will share a slot as we already know.
Printing
Before printing, load the AMS with the first four colors. Printing will start and you will need to be there to change the colors when needed.
No PAUSE command will be executed, so you will have to change the spools on the fly. You will have plenty of time, but you wont be able to leave the printer unattended!
The trick to not get confused, as soon as one color in a shared slot has finish, the AMS will unload that roll and continue with the next color. So while the next color is loading you can remove the unloaded color and load the next one.
For ex: in my model, the second color is YELLOW, as soon as it unloads the filament and start loading the BLACK, i will exchange YELLOW for BLUE. You will notice that blue is the last color to be used in the first layer, but I change it right away, so no confusion.
Another trick is to place postit notes on the AMS with the colors of each slot. So you wont be loading a color in the wrong slot, and avoid anxiety on each exchange. I had to check my Excel table each time to be sure I was loading the correct color.
Filament unload --> Exchange to the other color (look the postit. THAT'S IT!
Keep the color and layer order table at sight so you can see where you are at every moment in case you doubt if you are doing good.
Thats it! I cost some time, but what a lovely print you created!
Bonus Tips:
- If you are doing a lamp o something that light should see through, 3 layers of color (0.6mm) is a good balance between strength (not very flimsy) and transparency (so light can go through).
- If you are doing some faceplate, text, coaster or colored drawing on the bottom face, I use 2 layers of color (0.4mnm). Color will have good density and will save you from doing extra changes.
- Be sure the nozzle tip has no remains from previous colors, if possible quickly clean it while its purging. Those little remains in the tip usually come off over your print and could ruin a nice model.
Errata:
If you followed my instructions carefully and paid attention, you may have noticed that in 3rd layer, last color is green, and the next color coming is black. I forgot to write down that incompatibility! In the slot assignment, ive placed BLACK and GREEN together :(
It has an easy fix, I could have placed GREEN alone, and BLACK with RED. In order not to make all the pictures and Excel. Careful with that!
Downloads
Ive placed BambuStudio file so you can download the Playstation lamp ready to print (check if the colors match when slicing. The colors may come in a different order in your case.
Also placed F3D so you can edit with Fusion360 if you want.
Could not upload the Excel table as this platform dont allow this kind of file.
Share your experience printing with more than 4 colors!


