3D model description
Replace the loud, ineffective blower with a 80mm or 60mm fan to make your T300 cooler and more quiet.
Watch my video for all the details: https://youtu.be/_V3vlu-AfcM
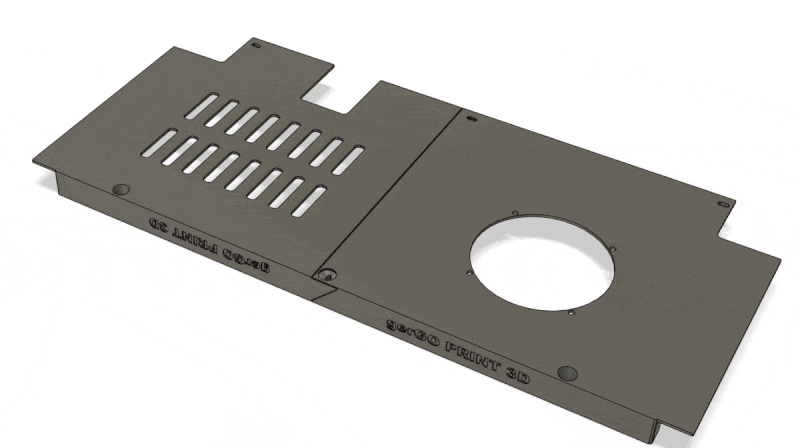
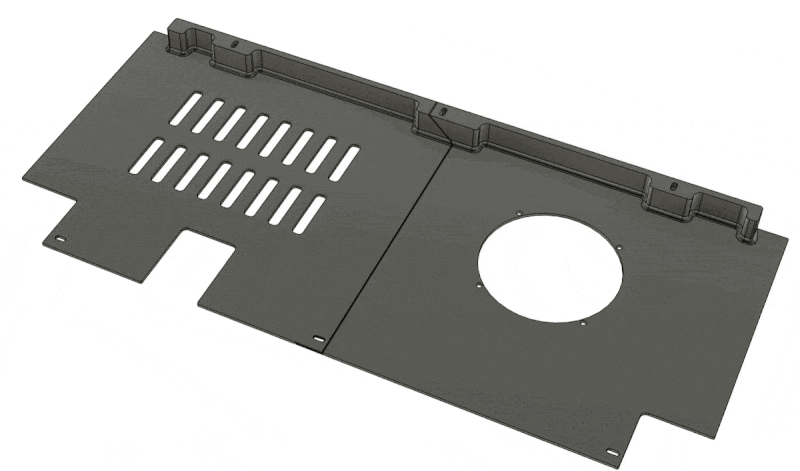
This model replaces the metal bottom cover with a 3D printable two piece solution with mounting holes for a 8010 / 8015 / 8020 / 6010 / 6015 / 6020 fan. Only 2 parts, minimal material, because of a clever overlap design, you can use just the 6 screws which held the original bottom.
Design goals
My design goals were to create an easily printable model that has the minimum number of components (2) can be printed from the minimum amount of material (220g of PETG or PLA), using the original screws. The two halves of the model can each be printed on the T300 in about 2 hours.
Compatible parts:
Converter
For 12V fan it's mandatory, but even if you use a 24V fan, I recommend adding a step-down (buck) converter to slow it for even more silent operation. Add the following lines to your printer.cfg to monitor its temperatures:
[temperature_sensor Rpi]
sensor_type: temperature_host
[temperature_sensor MCU]
sensor_type: temperature_mcu
sensor_mcu: mcu
Place the converter in the little compartment and use the peg to secure it in place, so it doesn't slip out of its holder. Leave enough cable on the input side to be able to plug it into the header the blower was (VOU).
Upgrade instructions
- print back half of the bottom cover and converter peg
- print one of the front halves matching your fan
- attach the fan (make sure it is oriented so it will blow the air out of the case) and do the wiring for the step down converter. If you don't have a JST2.5 plug you will be able to reuse the one on the existing blower fan.
- thread the bulk converter thru its conpartment, secure it with the peg
- prepare to flip printer to its side: raise the gantry over 250mm. Turn off the printer. Drag toolhead to the right. Unplug right z-motor, move motor cable under the printer
- flip the printer on its right side. Important: the gantry should be off the table (to avoid straining it)
- remove 6 screws holdning the bottom cover. We will reuse the screws
- unplug and remove the original blower fan.
- secure the back half of the bottom cover using the 2 side screws
- plug the buck converter in header marked (VOU)
- secure the font half, sharing the middle screw holes with the back half. Watch out for the screen cable.
- you can plug in and turn on the printer to check if the fan is spinning correctly. Wait for the main screen to settle before turning turning it off and unpluging.
- flip the printer on its base, plug in the right z-motor.
- re-plug and turn on the printer and be sure to do a z-tilt calibration (preferably with my z-tilt via knob macro
- during the first prints, check the RPI, MCU temps in the Mainsail interface, if they are over 50°C raise the voltage on the fan (via the step down converter)
UPDATE
Cooling fan speed adjustment access hole variant added. If you are using the recommended LM2596 adjustible speed buck converter there are now variants of the front piece which provide cutouts to align and access the voltage adjustment screw without removing the bottom cover. All 3 fan variants now have this option:
- T300 bottom - speed adj - front 96mm hole.stl
- T300 bottom - speed adj - front 80mm fan.stl
- T300 bottom - speed adj - front 60mm fan.stl
See included photos as well!
Disclaimer
While I have devoted considerable effort and thorough testing to this upgrade and STL models, I provide them as-is without any warranty of any kind. I cannot be held responsible for any damage or issues that may arise from their use. Please act responsibly around live voltage and heated tools. Your use of this procedure and models signifies your acceptance of this disclaimer.
3D printing settings
See upgrade instructions above to help you decide which parts to print. All parts can be printed without brims. The front half (including the buck converter compartment) will print without supports, no problem briging the compartment's top. However the back half will need supports under the overlapping area, which you will need to remove before assembly.
I printed everything out of PETG, but PLA is also sufficient. You don't need excessive walls or infill, it will hold well with 2 walls and 10% infill.
I've included two Orca Slicer projects, one for PETG and another for PLA.
Watch my detailed video about this mod: https://youtu.be/_V3vlu-AfcM
:format(webp)/https://fbi.cults3d.com/uploaders/22944044/illustration-file/db8b0251-0969-4879-8555-7219578249bb/20240416_085754.mp4_snapshot_02.46.825.jpg)


/https://preview3d-images.cults3d.com/n02dywytaku1k6cbs2eigkg8m20o)
/https://preview3d-images.cults3d.com/gmoq3up443lav8lir7ffz22g5mco)
/https://preview3d-images.cults3d.com/43zctxz5kp1zbj1tajea1cgcl9st)
/https://preview3d-images.cults3d.com/phac7l0ivo5g29qs4rycirwfc55c)
/https://preview3d-images.cults3d.com/sdgzeb0jo9t5mauz65smlqwn788k)


:format(webp)/https://fbi.cults3d.com/uploaders/22944044/illustration-file/9f2b3c3c-97a7-41a8-a478-526f93ed0492/v3-photo.jpg)
:format(webp)/https://fbi.cults3d.com/uploaders/22944044/illustration-file/61704c9c-63d4-41bc-bc56-6bd6eb1f330a/thumbs.jpg)
:format(webp)/https://fbi.cults3d.com/uploaders/22944044/illustration-file/88a72956-9f76-47f8-9931-841cc473fd61/20231117_231139.jpg)
:format(webp)/https://fbi.cults3d.com/uploaders/22944044/illustration-file/878e25c7-b515-4f44-8dd2-3a5916439a6e/20230512_130340.jpg)