Skip to content

Playseat Challenge Fanatec Shifter and Handbrake Mount

Advertising
Advertising
?
Creation quality: 5.0/5 (1 vote)
Evaluation of members on the printability, utility, level of detail, etc.

  • 3.8k views
  • 2 likes
  • 8 downloads
  • 2 comments

License
3D design format
STEP and ZIP Folder details Close
  • Lower_Bracket(LHD).step
  • Lower_Bracket(RHD).step
  • Shifter Mounts.zip
    • Left Mount (RHD)/Lower_Bracket(RHD).step
    • Left Mount (RHD)/Upper_Bracket(RHD).step
    • Right Mount (LHD)/Lower_Bracket(LHD).step
    • Right Mount (LHD)/Upper_Bracket(LHD).step
  • Upper_Bracket(LHD).step
  • Upper_Bracket(RHD).step

Learn more about the formats

Publication date 2023-08-19 at 10:53
Design number 1395084

DrKriegerAus

3D printer file info

3D model description

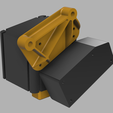
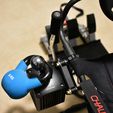
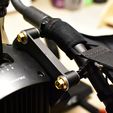
Simple yet tough and rigid mounting system for a Fanatec Clubsport Shifter and Handbrake.
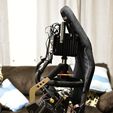
This was designed to mount both the shifter and handbrake to my chair without getting in the way of the folding seat or the wheel bar lifting to get in / out.
I didn't like the idea of big chunky prints or adjustable mechanisms to fail. This one is nice and discrete - bolt up and drive.

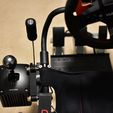
The handbrake is positioned just a tad behind the wheel so you don't accidentally hit it while reaching for the shifter, but it's close enough to make rally a breeze.

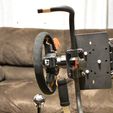
Note that I don't use a standard wheel position - I drilled some new holes in the playseat mounting plate as pictured to bring the wheel closer to me.

The mount does allow for some forward / backward adjustment of the handbrake handle (via rotation of the handbrake housing) if you don't use exactly the same wheel position.
You can also flip one or both of the mirror mounts to get a different angle or height.

I've also included models for LHD - procedure is the same just mirror everything.

I can lean way too hard on the shifter and pull the handbrake with a lot more force than needed to reach the stop and it barely budges.

The 6kg weight is not it's limit - it's just the heaviest thing I could find

You'll also need:
2x 25mm (1") motorcycle mirror mounts
2x M10x35mm Bolts - My mirror mounts used coarse thread bolts so check yours before you wreck a set with the wrong thread!
4x M10 Flat Washers
5x T-Nuts and M5 Bolts included with the shifter
5x M5 Flat Washers
5x M5 Spring Washers
2x M6x30mm Bolts for the bottom bracket to the shifter
1x M6x40mm Bolt for the bottom bracket to the handbrake
4x M6 Flat Washers
4x M6 Spring Washers
1x M6 Nut (I used Nyloc)

Installation is fairly straightforward.
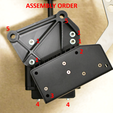
1. Mount the upper bracket to the shifter using the 4 T-nuts and bolts provided with the shifter (you'll need to remove the rubber stoppers under the shifter to get to the T-channels)
Push it up as far as it will go. Use flat washers and spring washers here. (Bolts marked 1 on the picture).
2. Take the cover off the handbrake and loosely bolt the front top hole to the shifter T-slot using the fanatec T-nuts (Bolt 2), and loosely bolt the bottom rear hole to the bottom bracket with the 40mm M6 bolt and nut (Bolt 3) - note the bracket is directional, and these bolts are fed through inside the handbrake. Again use flat washers and spring washers. Don't bolt the bottom bracket to the shifter yet.
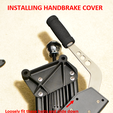
3. Put the rubber stoppers back on and slide the handbrake all the way down as pictured - this will let you get the hand brake cover back on.

4. Push the bottom bracket up under the shifter and bolt into place (Bolts marked 4)
5. Tighten the handbrake bolts (Bolt 2 and 3) once they are in their final position - the bottom bracket has a little bit of room for adjusting the final level position. You can reach them with a hex key from the outside of the handbrake.
6. Bolt the whole assembly onto the mirror mounts and onto the chair (Bolts marked 5). Make sure to use an M10 washer on each side of the printed part. Tip - Keep the mirror mounts and the M10 bolts a little loose until everything is in position, then tighten everything a little at a time evenly. You want it all to clamp up nice and straight.

3D printing settings

Both brackets use just over 100g of filament combined, and take 2.5hrs on a P1P
I used BambuLab PLA Basic for the rigidity, accuracy and layer adhesion.

Mostly the default BambuLab P1P settings apart from:
5 Walls, 5 Top / Bottom Shells. This makes the ribs solid with just a bit of infill around the M10 holes.

You might need more walls if you use a smaller nozzle - you want enough walls for the ribs to end up solid.

15% Gyroid infill is all you need - the design doesn't rely on infill.

Print direction is important for the bottom piece. Make sure you orient the print with the oval hole pointing up - this gives it the strength it needs in its final position.

Advertising


Issue with this design? Report a problem.

Would you like to support Cults?

You like Cults and you want to help us continue the adventure independently? Please note that we are a small team of 3 people, therefore it is very simple to support us to maintain the activity and create future developments. Here are 4 solutions accessible to all:

  • ADVERTISING: Disable your banner blocker (AdBlock, …) and click on our banner ads.

  • AFFILIATION: Make your purchases online by clicking on our affiliate links here Amazon.

  • DONATE: If you want, you can make a donation via Ko-Fi πŸ’œ.

  • WORD OF MOUTH: Invite your friends to come, discover the platform and the magnificent 3D files shared by the community!


Sharing and downloading on Cults3D guarantees that designs remain in makers community hands! And not in the hands of the 3D printing or software giants who own the competing platforms and exploit the designs for their own commercial interests.

Cults3D is an independent, self-financed site that is not accountable to any investor or brand. Almost all of the site's revenues are paid back to the platform's makers. The content published on the site serves only the interests of its authors and not those of 3D printer brands who also wish to control the 3D modeling market.
100% secure payment by credit card, PayPal, Apple Pay, Google Pay, etc.
View all payment options.