Skip to content

Runout Sensor Housing

Advertising
Advertising
?
Creation quality: 5.0/5 (1 vote)
Evaluation of members on the printability, utility, level of detail, etc.

  • 819 views
  • 10 downloads

License
3D design format
STL Folder details Close
  • Lower_Filament_Guide.stl
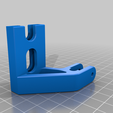
  • Runout_Sensor_Housing_Body.stl
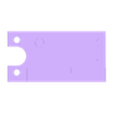
  • Runout_Sensor_Housing_Cover.stl
  • Upper_Filament_Guide.stl

Learn more about the formats

Publication date 2021-03-22 at 03:24
?
Published to Thingiverse on: 2020-11-09 at 06:35
Design number 337396

3D printer file info

3D model description

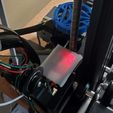
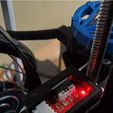
Runout sensor for Ender 3 V2 using Makerbot 1.2 endstop.

I started this build using JoseMSojo's Roller-gided filament sensor for Ender 3 V2 (https://www.thingiverse.com/thing:3840529) but the print never came out as I intended so I went looking to create a runout sensor housing that could be used separately using the same Makerbot endstop. I wired the sensor into my Raspberry Pi 4 using OctoPi and control using the Filament Sensor Reloaded. The housing cover is made to help dissipate light if you chose to print using a transparent filament.

BOM
1. Sensor housing body (printed)
2. Sensor housing cover (printed)
3. Makerbot 1.2 endstop (I found a pack of them at https://smile.amazon.com/gp/product/B075585VY4/ref=ppx_yo_dt_b_asin_title_o08_s00?ie=UTF8&psc=1)
4. Bowden PTFE tubing (20 mm approx.)
5. Raspberry Pi with OctoPi installed (I used a Pi 4B)
6. Lower filament guide (optional printed)
7. Upper filament guide (optional printed)

INSTRUCTIONS
1. Print the housing body and cover.
2. Insert the bowden tube into the front of the housing and cut excess. Note: The bowden tube will not go all the way through.
3. Insert the Makerbot sensor being careful not to damage the metal switch. Note: It is a tight fit.
4. Remove the bolts, washers, and nuts from the the z-axis mount.
5. Attach the sensor housing reusing the z-axis mount bolts, washers, and nuts.
6. *** Turn off the Raspberry Pi ***
7. Attach wire Makerbot pin 1 > Raspberry Pi pin 18 (GPIO 24).
8. Attach wire Makerbot pin 3 > Raspberry Pi pin 20 (Ground).
9. Attach wire Makerbot pin 4 > Raspberry Pi pin 1 (3V3).
10. Power on the Raspberry Pi.
11. Connect to OctoPi.
12. Install Filament Sensor Reloaded plugin.
13. Configure and save plugin with the following:
Pin: 24
Switch Type: Normally Open
Board Pin Mode: BCM Mode
Board Pin Resistor Mode: Pull up Resistor
14: Reboot Raspberry Pi.

Thread filament normally except now going through runout sensor housing. A red light on the Makerbot sensor should light up showing filament is present.

OPTIONAL
I've included a remix of a lower filament guide from Holspeed (https://www.thingiverse.com/thing:3052488) and remix of an upper filament guide from SwissToy (https://www.thingiverse.com/thing:3765501/remixes) to fit the runout sensor dimensions.

3D printing settings

-

Advertising


Issue with this design? Report a problem.

Would you like to support Cults?

You like Cults and you want to help us continue the adventure independently? Please note that we are a small team of 3 people, therefore it is very simple to support us to maintain the activity and create future developments. Here are 4 solutions accessible to all:

  • ADVERTISING: Disable your banner blocker (AdBlock, …) and click on our banner ads.

  • AFFILIATION: Make your purchases online by clicking on our affiliate links here Amazon.

  • DONATE: If you want, you can make a donation via Ko-Fi πŸ’œ.

  • WORD OF MOUTH: Invite your friends to come, discover the platform and the magnificent 3D files shared by the community!


Sharing and downloading on Cults3D guarantees that designs remain in makers community hands! And not in the hands of the 3D printing or software giants who own the competing platforms and exploit the designs for their own commercial interests.

Cults3D is an independent, self-financed site that is not accountable to any investor or brand. Almost all of the site's revenues are paid back to the platform's makers. The content published on the site serves only the interests of its authors and not those of 3D printer brands who also wish to control the 3D modeling market.

100% secure payment by credit card, PayPal, Apple Pay, Google Pay, etc.
View all payment options.