Skip to content

Garment Door Hanger

Advertising
Advertising
?
Creation quality: 5.0/5 (1 vote)
Evaluation of members on the printability, utility, level of detail, etc.

  • 1.7k views
  • 4 likes
  • 29 downloads

License
3D design format
STL Folder details Close
  • doorHanger-Main.stl
  • doorHanger-Main_no_star.stl
  • doorHanger-Medallion_NoName.stl
  • doorHanger-NamePlate.stl
  • doorHanger-Plug.stl
  • doorHanger-Star.stl

Learn more about the formats

Publication date 2018-07-05 at 13:32
Design number 28147

3D printer file info

3D model description

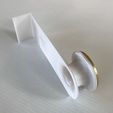
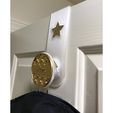
Use this Thing, and a door, to hang a garment bag, dry cleaning, a long dress, etc.

Printed in PETG, this hanger is quite strong. I had my full body weight on it, and I was more concerned that the door hinges would fail before this hanger failed!

The thickness of the part that wraps around the top of the door is 2mm, and this is thin enough to allow most interior doors to be fully closed without interfering with the door jam.

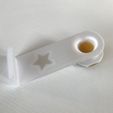
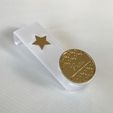
I have provided a version with the decorative star, and a version without the decorative star.

The decorative medallion comes in two versions: one that has a blank name plate, and one that has no name plate.

I printed one of these for each bridesmaid of a bridal party. I customized each with the name of a bridesmaid.

Build
Use PETG for the main body, and use whatever filament is convenient for the other parts. PETG has the property of being strong and flexible.

I printed at 0.2mm layer height, 50% infill. Use supports to print the main body, and to print the medallion.

I printed the main body in Atomic Filament Clear. I printed the other parts in PLA, and used gold spray paint to finish the star and medallion.

Assembly
Use super glue to attach the star.
Wad up a couple of layers of masking tape and place the wad inside the hole on the back side of the medallion.
Insert the mounting plug into the hole on the back of the medallion. If the rim of the plug will not clear the rim of the opening on the back of the medallion (allowing partial insertion), then reduce the size of the mini wad of tape.
Put super glue on the widest diameter of the plug, and while holding the rim of the medallion, press the plug into place in the opening on the main body. Press on the center of the face of the medallion to make sure that the plug fully inserted.
Wait for the glue on the plug / main body to cure.
Pull off the medallion and discard the mini wad of tape.
Use super glue to attach the medallion to the plug.

Advertising


Issue with this design? Report a problem.

Would you like to support Cults?

You like Cults and you want to help us continue the adventure independently? Please note that we are a small team of 3 people, therefore it is very simple to support us to maintain the activity and create future developments. Here are 4 solutions accessible to all:

  • ADVERTISING: Disable your banner blocker (AdBlock, …) and click on our banner ads.

  • AFFILIATION: Make your purchases online by clicking on our affiliate links here Amazon.

  • DONATE: If you want, you can make a donation via Ko-Fi πŸ’œ.

  • WORD OF MOUTH: Invite your friends to come, discover the platform and the magnificent 3D files shared by the community!


Sharing and downloading on Cults3D guarantees that designs remain in makers community hands! And not in the hands of the 3D printing or software giants who own the competing platforms and exploit the designs for their own commercial interests.

Cults3D is an independent, self-financed site that is not accountable to any investor or brand. Almost all of the site's revenues are paid back to the platform's makers. The content published on the site serves only the interests of its authors and not those of 3D printer brands who also wish to control the 3D modeling market.

100% secure payment by credit card, PayPal, Apple Pay, Google Pay, etc.
View all payment options.