Skip to content

Laser Cut Paper Calipers with Imperial and Metric Vernier

Advertising
Advertising
?
Creation quality: 5.0/5 (1 vote)
Evaluation of members on the printability, utility, level of detail, etc.

  • 2.4k views
  • 2 likes
  • 104 downloads

License
3D design format
Folder details Close
  • calipers.dxf
  • calipers.svg

Learn more about the formats

Publication date 2023-02-04 at 20:51
?
Published to Thingiverse on: 2014-09-29 at 06:47
Design number 1046904

3D printer file info

3D model description

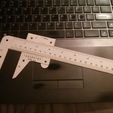
This is a remix of thing 26258 (http://www.thingiverse.com/thing:26258). It's a wonderful design, but the inches vernier is misaligned. I fixed it!

It was originally designed to be cut from acrylic and bolted together, but I've found it works wonderfully if it is cut from paper and double-sided taped together. The result is a super thin set of calipers that can be slipped in a binder, folder, or book yet still give accuracy down to a few hundred microns.

3D printing settings

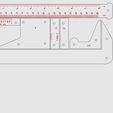
The SVG, DXF, and XPS should all be equivalent. SVG is good for Inkscape. DXF is good for other CAD. XPS is good if you have a Full Spectrum Laser.

Etch the red lines and cut the black lines. I've had good luck with cardstock and manilla folders. Anything standard A4 or even 8"x10" should work.

Use double sided tape like this to affix everything together. The long main section can get by with just a couple strips in the center, but it's best to use tape all the way to the edge of the point at the mouth of the calipers. Use an x-acto or similar knife to clean the edge of any excess tape. Affix the middle section of the metric vernier side to the back panel with a strip of tape flush with the edge near the mouth and a strip flush with the edge toward the slide. Use the slide as a guide to affix the middle section of the inches vernier to the back panel. The taping and spacing here is critical. You want things tight enough not to jiggle but loose enough not to bind. With plenty more tape along the mouth, attach the metric vernier top face. Put tape on the inches vernier middle piece, place the slide in place, and affix the inches vernier top face using the slide as a guide for spacing.

The above paragraph probably doesn't make sense, so cut a few extra sets of parts if you can manage. It takes me around 15 or 20 minutes to properly assemble one caliper. Care and attention are needed for a good result. If you don't want to be precise, laser cut a set in acrylic and bolt them together. Those just won't fit in the pocket of a 3-ring binder.

You may want to compare the final product to a good ruler to verify the scale of your laser (and to tell you if you need to trim any excess paper or tape from the mouth of the calipers).

I'll be looking into using spray adhesive, but I don't have time at the moment. Let me know if you figure out a faster way to assemble these but still do it well.

Advertising


Issue with this design? Report a problem.

Would you like to support Cults?

You like Cults and you want to help us continue the adventure independently? Please note that we are a small team of 3 people, therefore it is very simple to support us to maintain the activity and create future developments. Here are 4 solutions accessible to all:

  • ADVERTISING: Disable your banner blocker (AdBlock, …) and click on our banner ads.

  • AFFILIATION: Make your purchases online by clicking on our affiliate links here Amazon.

  • DONATE: If you want, you can make a donation via Ko-Fi πŸ’œ.

  • WORD OF MOUTH: Invite your friends to come, discover the platform and the magnificent 3D files shared by the community!


Sharing and downloading on Cults3D guarantees that designs remain in makers community hands! And not in the hands of the 3D printing or software giants who own the competing platforms and exploit the designs for their own commercial interests.

Cults3D is an independent, self-financed site that is not accountable to any investor or brand. Almost all of the site's revenues are paid back to the platform's makers. The content published on the site serves only the interests of its authors and not those of 3D printer brands who also wish to control the 3D modeling market.

100% secure payment by credit card, PayPal, Apple Pay, Google Pay, etc.
View all payment options.