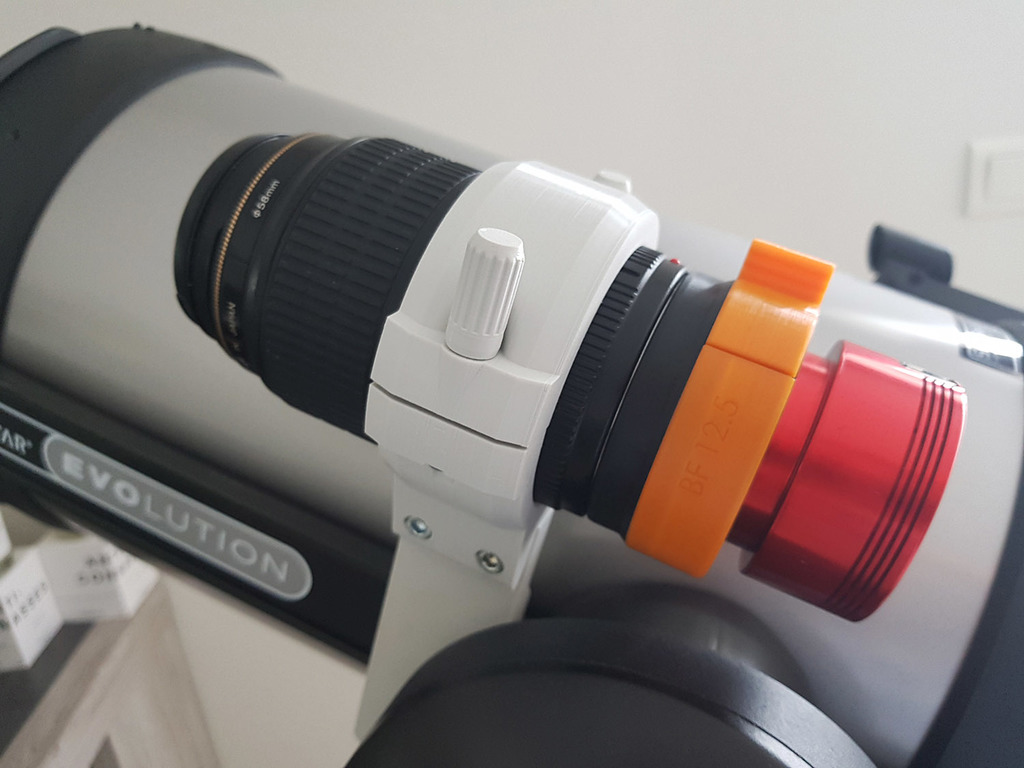
Adapter with filter holder for Canon lenses and ZWO ASI cameras
Adapter with filter holder for Canon lenses and ZWO ASI cameras
https://youtu.be/NrrTekI_tjI
This adapter is compatible with EF and EFS mount lenses (longer rear cap).
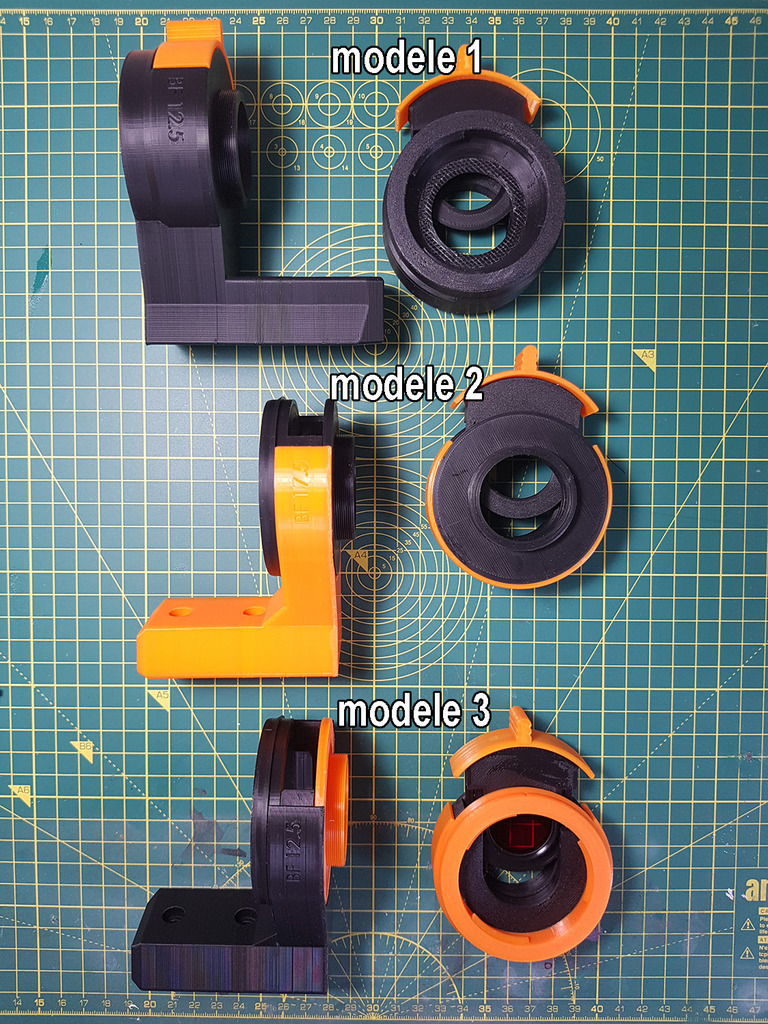
Two versions for the backfocus ASI 12.5 and 17.5 . Each version is declined in 3 models.
Why 3 models ? Well, first of all I wanted a model that prints without any supports but that implied a larger number of parts and collages. It appeared that with a minimum of supports I could combine 2 or 3 pieces together, simplifying the realization. There are possibilities to have several colors, a foot or not, so it leaves more flexibility and choice to people to make according to their needs.
Initially the only model included 4 parts for the body of the adapter> 1 Canon ring, 1 filter chamber, 1 T2 plate and a casing intended to wrap the whole to ensure the waterproofness to the light at the level of gluing, with also an aesthetic side (possibility of a part of different color).
This model ( which is now the model 3) prints without any supports and will interest those who are resolutely allergic to supports, and there are some!
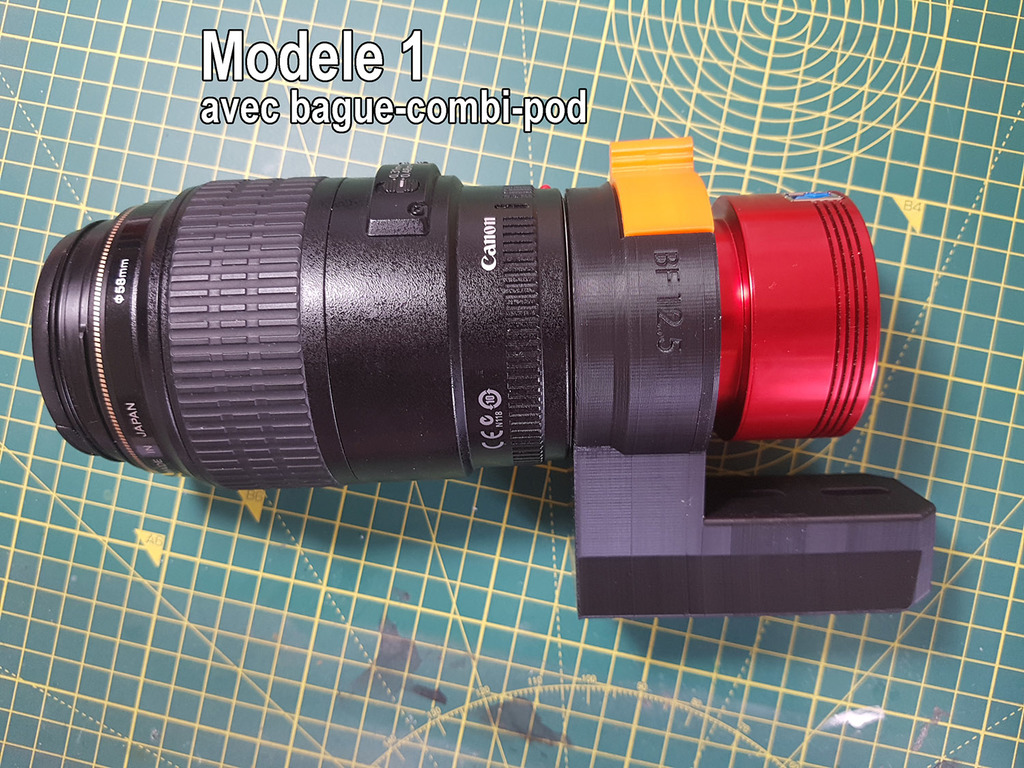
The model 1 :
In this model , the Canon ring , the filter chamber and the housing have been combined into one piece; the Canon-Combi ring. You can choose this ring or the ring-Canon-Combi-pod to have a foot with Vixen profile with 2 lights for vic CHC M6.
This model requires supports and if there are residues after printing they will have to be cleaned well on the backfocus 17.5 version because in this version the Canon ring is smaller and the EFS lenses have the rear cap longer than on the EF.
If you choose the model with foot ( ring-canon-combi-pod) this one leaves towards the back (towards the camera) , it was the condition to not have additional sticking.
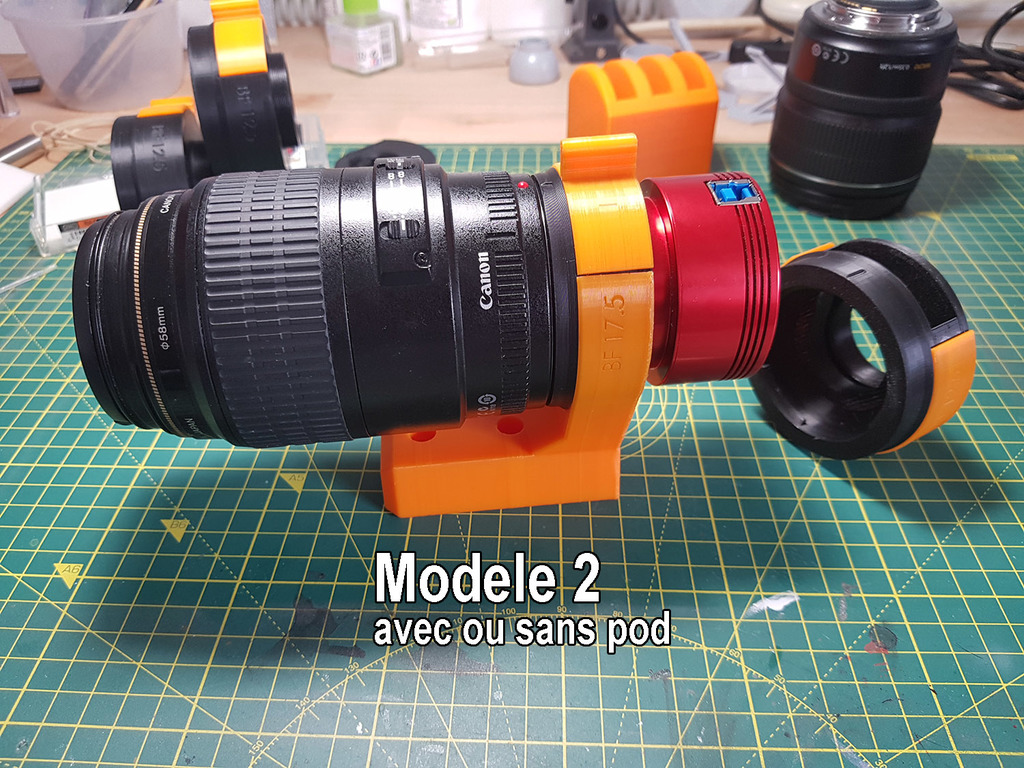
Model 2:
In this model the housing has not been combined with the other parts. This leaves the possibility
to mix the colors and choose either the simple housing or the housing-pod , so with a foot that this time will go to the front.
Like the model 1 it requires supports.
Model 3:
It was the initial model! Big advantage it prints without supports but has more pieces and therefore more collages. More pieces so more possibilities to marry the colors.
Assembly:
I recommend 2 component epoxy glue (easily found), I use a glue made of
syringe that takes in 10min.
The difficulty I encountered is the so-called "elephant's foot" phenomenon, which consists of a widening of the first layers during printing. This problem does not make it easy to assemble the parts and it is best to try to remove the bead with a deburrer before assembly.
Everyone is more or less faced with this problem and I hope you will not be at the same level as me!!! To minimize this phenomenon I added a small chamfer at 70° at the bottom of the parts to compensate a little for this widening.
Be careful when applying the glue, do not put too much or too close to the edges to avoid that it does not overflow. If you are not used to this type of glue, glue one piece at a time (prepare very little mixture).In the attached illustrations, I indicate the areas where to apply the glue.
Whatever the model, before gluing the T2 plate, screw your camera has thoroughly on the plate, this will allow to position the usb plug of the camera in the desired position.
Once the body is assembled, insert the filter holder, put 2 dots of glue in the 2 holes of positioning and put a little between these 2 holes (a thin line) and position the cap on the filter holder.
Printing:
All of my pieces were printed in PLA+ from Sunlu.
30% fill
4 perimeters and even 5 for the parts with the foot ( which will be subjected to a lot of pressure with the tightening of the screws).
I provide screenshots for the position of the parts on the printing plate.
I use Simplify3D which allows to vary the height of the layers ( and many others
parameters) during printing. For example for the T2 plate I start at 0.16 or 0.2 mm for the flat part and go to 0.12 for the thread.
All threads must be printed at 0.12 max. and at rather low speed 30/35 mm/s.
Lower your flow if you extrude a little too hard.
To finish I attached a RAR archive with all the files (stl, illustrations ...)
organized by version and model folders.
Good realization!
Google translation ( sorry)
Adapter with filter holder for Canon lenses and ZWO ASI cameras
This adapter is compatible with EF and EFS mount lenses (longer rear base).
Two versions for ASI 12.5 and 17.5 backfocus. Each version is available in 3 models.
Why 3 models? Well I wanted first of all a model that prints without any
supports but that involved a greater number of pieces and collages. It appeared that with
a minimum of supports I could combine 2 or 3 pieces together, thus simplifying the
production. There are possibilities to have several colors, one foot or not, in short it leaves
therefore more modularity and choice for people to do according to their needs.
Initially the only model included 4 parts for the adapter body> 1 Canon ring, 1
filter chamber, 1 T2 plate and a casing intended to wrap the assembly to ensure
the light tightness at the bonding level, also with an aesthetic side (possibility
of a different color piece).
This model (which is now model 3) prints without any media and will interest those
who are resolutely allergic to supports, and there are!
Model 1:
In this model, the Canon ring, the filter chamber and the housing were combined in one
room ; the ring-Canon-Combi. You can choose this ring or the Canon-Combi-pod ring for
have a Vixen profile stand with 2 lights for vic CHC M6.
This model requires supports and if there is residue after printing they will have to be fine
cleaned on the 17.5 backfocus version because in this version the Canon ring is smaller and
EFS lenses have a longer rear base than EFs.
If you choose the model with foot (ring-barrel-combi-pod) it goes backwards (towards
the camera), it was the condition not to have additional bonding.
Model 2:
In this model, the housing has not been combined with the other parts. That leaves the possibility
mix the colors and choose either the single housing or the housing-pod, so with a foot
which this time will go forward.
Like the model 1 it requires supports.
Model 3:
It was the original model! Big advantage it prints without supports but has more parts and therefore
more collages. More pieces therefore more possibilities to marry the colors.
Assembly:
I recommend 2-component epoxy glue (easily found), I use
syringe which takes 10min.
The difficulty I encountered is the phenomenon known as the "elephant foot" which consists of a
widening of the first layers during printing. This problem does not facilitate assembly
parts and it is better to try to remove the bead with a deburring tool before assembly.
Everyone is more or less facing this problem and I hope you will not be
same level as me ! To minimize this phenomenon I added a small chamfer at 70 ° at the bottom
parts to compensate a little for this enlargement.
Be careful when applying the glue, do not put too much or too close to the beads to avoid it
overflows. If you are not used to this type of glue, stick one piece at a time (do not
prepare very little mixture) .In the attached illustrations, I indicate the areas or
apply the glue.
Whatever the model, before sticking the T2 plate, screw your camera fully onto the plate
, this will position the usb socket of the camera in the desired position.
Once the body is assembled, insert the filter holder, put 2 dots of glue in the 2 holes
positioning and drop a little between these 2 holes (a thin line) and position the
cap on the filter holder.
Printing:
All my pieces were printed in PLA + from Sunlu.
30% filling
4 perimeters and even 5 for the parts with the foot (which will be subjected to a lot of pressure
tightening the screws).
I provide screenshots for the position of the parts on the print bed.
I use Simplify3D which allows you to vary the height of the layers (and many others
settings) during printing. For example for the T2 plate I start at 0.16 or 0.2 mm
for the flat part and I go to 0.12 for the thread.
All threads must be printed at 0.12 max. and at rather low speed 30/35 mm / s.
Lower your flow if you extrude a little too hard.
Finally I attach a RAR archive containing all the files (stl, illustrations ...)
organized by version and model folders.
Good achievement!
:format(webp)/https://fbi.cults3d.com/uploaders/16327872/illustration-file/63be522f-939b-4f0b-b53b-b4442f6c5c3d/20200524_124944.jpg)


/https://preview3d-images.cults3d.com/oar4d89q5os3eg5clm6ksx4rr83q)
/https://preview3d-images.cults3d.com/ggowieqmjum99nk9msp3xsi3q7k6)
/https://preview3d-images.cults3d.com/kwmp8gyqxl562gfd5haccisgg9zy)
/https://preview3d-images.cults3d.com/u7u89jg03ephelded1phy4b3lza5)
/https://preview3d-images.cults3d.com/fd2ik3feg70at8tyhbpfii6v9uto)
/https://preview3d-images.cults3d.com/k6ms7psrh9bnyoo9ihv6ak7eudq4)
/https://preview3d-images.cults3d.com/rm7rg0ohxbm64q7sbelqy0htv0ww)
/https://preview3d-images.cults3d.com/7sew79ewe5iuil0ov5tlksqh01hc)
/https://preview3d-images.cults3d.com/l0igksf5ys8etor0m41fm965ntei)
/https://preview3d-images.cults3d.com/c518uflzsw9je57w4jboys1lylhu)
/https://preview3d-images.cults3d.com/u87da5adtwiefhi62685ri374kuv)
/https://preview3d-images.cults3d.com/uruwapfvvpgfovbs5h6nx2xu92lw)
/https://preview3d-images.cults3d.com/5ajj69udjtawbheta73nc95oka3h)
/https://preview3d-images.cults3d.com/58xbawdkhjy9lwdhrhsxwjtv1lgt)
/https://preview3d-images.cults3d.com/ymp7zhprx5htop9sng0lg5vv37pq)


:format(webp)/https://fbi.cults3d.com/uploaders/16327872/illustration-file/7d268b56-1e15-48ee-b951-622cad8bdb83/20160618_150049.jpg)
:format(webp)/https://fbi.cults3d.com/uploaders/16327872/illustration-file/d5a80679-16e5-4e9f-b24b-547cb505b2f6/T2Arm02.gif)
:format(webp)/https://fbi.cults3d.com/uploaders/16327872/illustration-file/6f9f591d-5a71-4d90-9c9b-5a7e693149a6/20161116_150508.jpg)
:format(webp)/https://fbi.cults3d.com/uploaders/16327872/illustration-file/3690dfc7-564b-4f46-8090-f0fdfb252dd9/20161130_122604.jpg)